Thursday, November 27, 2008

Happy Thanksgiving!!


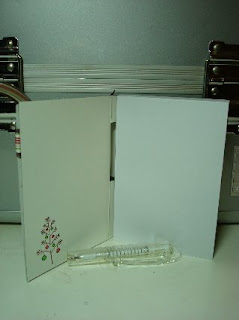
Wishing you and your family a very Happy Thanksgiving. May you be blessed today and always. Enjoy my Thanksgiving Card for this year!


My 2nd Signature

Tuesday, November 25, 2008

Holiday Extravaganza Flyer!!
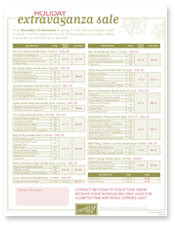
It's here, the Holiday Extravaganza Sale Flyer that is! Click on the image below to check out all the great deals that are available starting today, Nov. 26-Dec. 1. The savings range from 20-50% off and remember that quantities are limited so make sure you order yours now! To do so, just click on over to my Stampin' Up! Business Site, click on "Shop Now" and enter your bundle item numbers. If you have any questions please contact me. As a reminder, this is an online order special only so be sure to take advantage of it before items run out!


Happy Stampin'!
My 2nd Signature

Monday, November 24, 2008

Holiday Extravaganza!


Starting Wednesday, November 26-December 1, Stampin' Up! will be having a Holiday Extravaganza Sale! There will be BIG savings on special product bundles, but in limited quantities so you will want to order these ASAP! This sale is so amazing that Stampin' Up! has not yet given even us demonstrators all the details!!

Beginning Wednesday, you can take advantage of these great deals by visiting my Demonstrator Business Website and then clicking on the "Shop Now" button. Or, go directly to the Online Ordering site, then be sure to select "Priscilla Aguilar" from Montebello, CA as your Demonstrator.

Contact me for any questions or further details. Happy Stampin'!

My 2nd Signature


Christmas Stamp-A-Stack Samples:Punch Pals
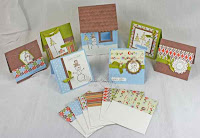


Punch up your gift giving this holiday season with this adorable little house and six coordinating cards with envelopes created using the Frosty Day DP and Punch Pals stamp set! Include one of these 4” x 4” gift cards with each of the presents you give out this year and then package up some treats in a cello bag, put them in the box, and give the box itself as a gift! You could also gift that hard-to-shop for person with the whole set!

Note: I have not decided yet which of these cards we will be making for the Christmas Stamp-A-Stack but we will be making perhaps 3 of these and 2 others using different sets for a total of 5 cards, not 6. Again, we will make 2 cards each of 5 designs for a total of 10 cards.

Date: Sunday, Dec. 7, 2008
Time: 1:30pm-4:30pm
Cost: $20
Location: Roz' House (Los Angeles, CA)
Please email me to sign up for this class: AngelFae20@aol.com

Supplies:

• Stamps: Punch Pals, Snow Swirled, Home for Christmas

• Inks: VersaMark pad, Chocolate Chip, Close to Cocoa, Kiwi Kiss, Tangerine Tango, Bashful Blue, Riding Hood Red, Real Red, Classic inks, Chocolate Chip Stampin’ Write Marker

• Paper: Frosty Day DP, Ski Slope DP, Whisper White, Close to Cocoa, Bashful Blue, Kiwi Kiss, Riding Hood Red, Real Red Medium Whisper White envelopes

• Accessories: Medium Whisper White Envelopes, Sticky strip, Snail adhesive, Stampin’ Dimensionals, 2-way glue pen, Little Felt Flurries, Alpine Ribbon, Riding Hood Red 1-1/4" Grosgrain Ribbon, Riding Hood Red Taffeta Ribbon, Kiwi Kiss/Very Vanilla satin ribbon, Silver Cord, Dazzling Diamonds glitter, Paper Snips, Scallop Edge Punch, 1/16” handheld circle punch, 1/8” handheld circle punch, ¾” circle punch, 1 ¼” circle punch, 1 3/8” circle punch, Scallop Circle punch, Tag Corner Punch, Corner Rounder Punch, Rectangle Punch, Small Tag Punch, Tag Punch, 1 ¼” Square Punch, Word Window Punch, Blender Pens, Stampin’ Scrub, Stampin’ Mist, Paper Trimmer & scoring blade, Bone Folder, Paper Piercing Tool, foam mat, Stampin’ Sponges, pencil & ruler

If you are unable to make it to the class but still want to make the cards then please contact me to purchase this Class-To-Go Kit. You will get all the Cardstock and Designer Series Paper you need to complete the projects, pre-cut but I cannot provide you the stamped images because it is against Stampin' Up! Policy to do so. You will also receive detailed instructions on how to complete the cards. If you don't have the above stamp sets you can order them from me here or you can substitute with whatever stamps you may have on hand. The cost for the Class-To-Go Kit is $20 plus $4.50 for shipping and handling.

Please do not hesitate to contact me if you have any questions, concerns, etc. I hope to see you all on Dec. 7!

Happy Stampin',

My 2nd Signature


Disclaimer: These classes are not available for purchase to other Stampin' Up! Demonstrators. If you are a demonstrator and are interested in this class, please email me @ AngelFae20@aol.com directly.

Saturday, November 22, 2008

Watercoloring Video

Are you interested in Watercoloring but not sure how to go about doing it? Well, Stampin' Up! has put together a great video tutorial that shows you exactly how to use the Watercoloring Technique for your projects, including what supplies you would need to achieve this look. Just click on the picture below and watch the video. If you have any questions, feel free to ask me.


Happy Stampin'!


My 2nd Signature

Thursday, November 20, 2008

Country Living Promotion Video


Good Evening Stampers! I just wanted to share with you this great video by Stampin' Up! CEO, Shelli Gardner! She talks about the Country Living Holiday Collection Stampin' Kit being offered through Stampin' Up! and Country Living Magazine. She also demonstrates how to put together the garland that is displayed on the image above. This is an exclusive kit that includes an exclusive stamp set, and is only available until Dec. 31st. To purchase this kit you can order it directly online here and then clicking on the "Shop Now" button.


Click Here to watch the video, and I hope you enjoy it, I sure did! Have a Good Night and Happy Stampin'!


My 2nd Signature

Wednesday, November 19, 2008

Diana's Workshop Samples
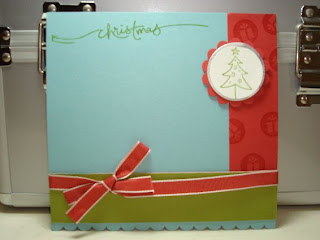
Evening Stampers! Tonight, I'll be sharing the three projects that we did at Diana's Workshop last Saturday. She requested that we do a Scrapbook Page, Thanksgiving Name Place Setting and a Gift Card Holder. Of course, I obliged. So below are the projects I came up with. Enjoy!


This is a 6x6 Scrapbook Page that I CASED from the Stampin' Up! Demonstrator site just changed it by using different stamps than the ones listed. I started off by stamping the Riding Hood Red strip with the gift image from the Party Hearty Set, thinking I would make a Birthday Page. But then after stamping that image and trying to decide what colors to choose for the cupcake image I changed my mind and went for a Christmas Page instead. The set I chose to use was the Punch Pals Set. But since I had already stamped the gift, I left that part as it was but had the guests choose their own image from the Punch Pals set to stamp onto the Riding Hood Red piece, using Riding Hood Red ink. The tree image is also from the Punch Pals set and I stamped it in Old Olive ink onto a scrap piece of Whisper White Cardstock and punched out with the 1-3/8" Circle Punch. I used the White Metal Edge tage but just removed the white paper and attached the Christmas tree to the tag. I then took a piece of Riding Hood Red Cardstock and punched out the circle using the Scallop Circle Punch and adhered them together.

For the title I stamped just the word "Christmas" from the Heard from the Heart set by coloring it in using an Old Olive Stampin' Write Marker onto the Baja Breeze Cardstock. The bottom edge of the cardstock was made using the Scallop Edge Punch. Finally, I attached the Riding Hood Red to the far right of the Baja Breeze, then tied the Riding Hood Red Taffeta Ribbon around the Old Olive piece. I attached that just above the scallop edge. Last I used Stampin' Dimensionals to attach the Christmas Tree tag to the right side of the page. Quick and easy huh?


All Supplies Stampin' Up!
Stamps: Punch Pals, Party Hearty
Ink: Riding Hood Red, Old Olive
Paper: Baja Breeze, Riding Hood Red, Old Olive, Whisper White
Accessories: 1-3/8" Circle Punch, Scallop Circle Punch, Scallop Edge Punch, Riding Hood Red Taffeta Ribbon, Old Olive Stampin' Write Marker, Stampin Dimensionals


First of all, I'd like to apologize for the glare on this picture, it's the best picture I could take. This was another quick and easy project that we made, and it's made using a Black Medium Sized Binder Clip! I cut 2 strips of the Autumn Vine Designer Series Paper and attached them to the front and back for th Binder Clip to cover it. Then I stamped the pumpkin from the Happy Blessings set onto a scrap piece of Whisper White Cardstock and punched it out using the 1" Circle Punch. It was colored in using the Blender Pens and Pumpkin Pie Ink, Old Olive Ink and Chocolate Chip Stampin' Write Marker. Then using the 1-1/4" Circle Punch I punched out a circle from a scrap piece of Old Olive Cardstock and attached the pumpkin to this piece. To attach this to the clip I used mini glue dots.

The name tag was made by cutting a piece of the Really Rust Cardstock and Whisper White Cardstock and layering them together. The small pumpkin, acorn and leaf are also from the Happy Blessings set, they're actually a part of the hay image! All I did was color in that specific part of the stamp using a Chocoloate Chip Stampin' Write marker and stamping it onto the Whisper White! I then used Blender Pens to color in the images using Pumpkin Pie, Old Olive and Creamy Caramel Ink. Easy, Peasy! The final step is to tie a piece of Only Orange1/4" Grosgrain Ribbon around the Binder Clip and sliding in the name tag.

All Supplies Stampin' Up! (Unless otherwise noted)
Stamps: Happy Blessings
Ink: Chocolate Chip, Creamy Caramel, Old Olive, Pumpkin Pie
Paper: Old Olive, Really Rust, Whisper White, Autumn Vine Designer Series Paper
Accessories: Chocolate Chip Stampin' Write Marker, Blender Pens, 1" Circle Punch, 1-1/4" Circle Punch, 1/4" Only Orange Grosgrain Ribbon, Mini Glue Dots, Binder Clips (Office Depot)


Again, I apologize for the poor quality of this picture. I don't know why it's so dark but the one I took that was not dark was too blurry and I took it like a thousand times! LOL The ladies loved this gift card holder a lot and I sold a lot of the supplies used to make this. I got the idea from the wonderful Dawn Griffith! She has great video tutorials on her site, so check it out when you have the chance. This was made using a piece of Whisper White Cardstock that is scored and punched using the Word Window Punch to make a slot for the gift card.
I used the Corner Rounder Punch to round the corners of the Ski Slope Designer Series Paper and the front flap of the holder. I attached two pieces of the Ski Slope DP, one to the flap and one to the front of the holder. I then used Real Red ink and Stamped Season's Greetings from the Snow Swirled Set on the bottom right corner. I then stamped the tree from the same set in Kiwi Kiss Ink onto a piece of Whisper White Cardstock and layered it onto a piece of Real Red Cardstock. Lastly, I stamped the snowflake in Baja Breeze Ink onto Whisper White Cardstock and punched it out using the Snow Blossom Punch and adhered it to the Christmas Tree image using Stampin' Dimensionals. Another quick and easy project!


All Supplies Stampin' Up!
Stamps: Snow Swirled
Ink: Baja Breeze, Kiwi Kiss, Real Red
Paper: Whisper White, Real Red, Ski Slope Designer Series Paper
Accessories: Word Window Punch, Snow Blossom Punch, 3/16" Corner Rounder Punch, Stampin' Dimensionals


Well, have a Good Night Stampers and Happy Stampin'!
My 2nd Signature

Rescheduled: Christmas Stamp-A-Stack

Hi Stampers! Just wanted to let you know that I had to reschedule my Christmas Stamp-A-Stack to Sunday, Dec. 7 at 1:30pm. Again, we will be making 10 cards, 2 each of 5 designs for $20. I will provide all the supplies to make the cards but you must provide your own adhesive. If you don't have any you are more than welcome to order it through me. Also, if you are unable to attend but would still like to make the cards you can order the class by mail and pay the $20 plus shipping.

I will be posting pictures of the cards later on this week so you know what we'll be making. As always please contact me for further details or if you have any questions.

Happy Stampin'!

My 2nd Signature

Tuesday, November 18, 2008

Holiday Mini Class Part 2

Hi Stampers! As promised, here are the last two projects from the Holiday Mini Class. Hope you like them!


This is a cute little notebook with pen made using the Mr. Twigster set from the Holiday Mini. This set is soo cute I love it! I mounted a piece of Natural White Cardstock to the front of the notebook and mounted a piece of the Ski Slope Designer Series Paper to the Natural White. The snowman from Mr. Twigster was stamped in Chocolate Chip onto a small piece of Natural White Cardstock and colored in using blender pens. I then mounted it onto a piece of Riding Hood Red Cardstock and attached this to the left of the DSP. Then I stamped the word "Wishes" from the Fundamental Phrases Stamp Set in Chocolate Chip on the right of the image.
I wrapped a piece of the Alpine Striped Ribbon around the top of the notebook and stamped the tree image also from the Mr. Twigster Stamp set onto the front inside cover in Chocolate Chip and colored it in with Blender Pens and it's finished!
All Supplies Stampin' Up!
Stamps: Mr. Twigster, Fundamental Phrases
Ink: Chocolate Chip, Real Red, Old Olive, Pumpkin Pie
Paper: Natural White, Riding Hood Red, Ski Slope Designer Series Paper
Accessories: Alpine Striped Ribbon, Blender Pens, Sticky Strip
And finally, here's the last project, a gift tag packet. I really liked the color combination for this project, it's very festive! To make the gift tags I adhered pieces of the Ski Slope Designer Series Paper to squares of Chocolate Chip, Baja Breeze and Real Red Cardstock. I then stamped the images from the Deck the Halls Stamp Set in Real Red, Chocolate Chip and Baja Breeze ink. I didn't add the ribbon or cord yet because I haven't decided if I want to add ribbon or cord. LOL But if you'd like to add cord you could punch holes using the Double Circle Punch and tie some of the silver elastic cord available in the Holiday Mini and double knot it for each tag.
The packet is made using a piece of Chocolate Chip Cardstock and I attached a Bitty Page Protecter to the inside center of the packet using Sticky Strip. I then mounted a strip of the Ski Slope DSP to the top front flap of the packet. Before adhering the Real Red strip I wrapped it around the packet and then wrapped around the Brown Felt Ribbon around the strip to figure out where to tie it on. I used my Crop-A-Dile to punch holes through the ribbon and cardstock to attache the Jumbo Pewter Eyelets and the Felt Flurries. Once this was all assembled adhered the ends of the Belly Band (Real Red strip), wrapped and tied the ribbon around it and slid the band on the packet and Voila! Cute right?
All Supplies Stampin' Up!
Stamps: Deck the Halls
Inks: Real Red, Chocolate Chip, Baja Breeze
Paper: Chocolate Chip, Baja Breeze, Real Red, Whisper White, Ski Slope Designer Series Paper
Accessories: Alpine Brown Felt Ribbon, Felt Flurries, Bitty Page Protecter, Pewter Jumbo Eyelet, Crop-A-Dile, Sticky Strip
If you'd like more details (measurements, etc.) feel free to contact me and I will provide you the information. Well, it's late so I'll have to post the samples from my workshop tomorrow. Thanks for stopping by tonight! Happy Stampin'!
My 2nd Signature

Quick Note

Hi Stampers! Just wanted to let you know that things have been hectic since my workshop this past weekend but I will be posting some pictures of the projects made at the workshop on Saturday as well as the last 2 projects from the Holiday Mini Class I participated in. I'm going to try my hardest to do that tonight! Till then, Happy Stampin'!

My 2nd Signature

Thursday, November 13, 2008

Holiday Mini Class Projects

Good Morning Stampers! Wow, this is the first time I post in the morning, Yay me! As I promised yesterday, today I am posting the pictures of projects I made from a Holiday Mini Class I participated in through Barbara Jackson, from the UdderlyAwesome Stampers Group. This group consists of all of my uplines, sidelines, downlines etc. They're a great bunch of stampers! This class was similar to the Halloween Treats Class that Angie Juda had available. Barbara mailed me all the supplies ( I was unable to attend the class) and instructions and I just stamped and put them together. So much fun!


Aren't these projects fabulous?! I enjoyed making these very much and think they came out great!


This was a cute little Halloween Treat Box that was made out of just 1/2 a sheet of Elegant Eggplant Cardstock! The fence image is the Frightful Fence Jumbo Wheel from the Holiday Mini. The Cat, bat and pumpkin images are all from the Halloween Frights set also from the Holiday Mini. The fence was stamped and embossed onto Glossy White Cardstock. The background was brayered with Summer Sun, and the moon was a 1-3/8" circle punched out of a Post-It Note and attached to the cardstock. I then brayered over the moon with Pumpkin Pie and Elegant Eggplant. I forgot to mention that you will do this before stamping the fence onto the cardstock. You then remove the "moon mask" and you will have a moon in your background!
The cat was stamped in Basic Black Craft Ink onto a scrap of Whisper White Cardstock, embossed and then cut out. The pumpkin was stamped in Pumpkin Pie Craft Ink onto a scrap of Whisper White Cardstock, embossed and then cut out. Then I adhered the Glossy White Cardstock to the Old Olive piece of Cardstock and then adhered this to the already assembled box. I attached the handles by punching a 1/16" inch circle through the box, handles and ribbon and attached them with black brads. The last part is to add the candy filled cello bag and it's finished!


All Supplies Stampin' Up!
Stamps: Halloween Frights, Frightful Fence Jumbo Wheel
Ink: Summer Sun, Pumpkin Pie, Elegant Eggplant Classic Pads and Basic Black, Pumpkin Pie Craft Pads
Paper: Glossy White, Old Olive, Elegant Eggplant, Basic Black
Accessories: Black Brads, 1/16" Circle Punch, 1-3/8" Circle Punch, Stampin' Dimensionals, Tangerine Tango Striped Ribbon, Olive 1/4" Grosgrain Ribbon, Eggplant 1/4" Grosgrain Ribbon, Black and clear embossing powder, heat tool, rubber brayer, Sticky Strip, Scoring Tool, Post-It Note, Paper Snips


This Halloween card was also quick and easy to make. The Only Orange piece of Cardstock was stamped with the Canvas Background Stamp in Basic Black. The Basic Black Cardstock piece was adhered to the very left of the Kiwi Kiss Card Base. The Only Orange was then ahdered to the very left of the Basic Black piece. Before attaching the Basic Black to the Old Olive, make sure you attach the Kiwi Kiss Striped Grosgrain Ribbon to the Only Orange and to the back of the Basic Black, then attach this to the Old Olive. I hope I didn't confuse you!


All of the images used are from the Eat, Drink and Be Scary Set from the Holiday Mini. The hat and Definition of Halloween images were stamped onto Old Olive Cardstock using Basic Black Ink. The witch's hat was cut out and I attached Fire Square Rhinstone Brads in Orange (small and large). The definition was distressed along the edges and I then sponged the edges using Basic Black ink. Both were adhered to the front of the card using Dimensionals.


For the inside of the card, you just stamp the little spider in Basic Black ink coming down the top, right side of the cardstock. The tag is made out of the Tag Punch and Small Tag punch using Basic Black and Only Orange Cardstock then attaching it to the inside using Snail Adhesive. That's it!


All Supplies Stampin' Up!
Stamps: Eat, Drink and Be Scary
Ink: Basic Black
Paper: Kiwi Kiss, Basic Black, Only Orange
Accessories: Fire Square Rhinestone Brads (Orange), Kiwi Kiss Striped Grosgrain Ribbon, Distressing Tool, Stampin' Dimensionals, Stampin' Sponge, Small and Large Tag Punches, Paper Piercing Tool

This cute little Thanksgiving Favor Bag is so quick to assemble and you just won't be able to help but fall in love with the cute Scarecrow! He is from the Happy Blessings Set from the Holiday Mini. Before assembling the bag you will stamp the pumpkin and haystack images from the Happy Blessings Set unto the More Mustard Cardstock in More Mustard Ink. You will then take the Key Tag Punch and punch in from the left side and stamp the Sentiment from the set on the right side, in Basic Brown Ink. He's stamped in Basic Brown unto Whisper White Cardstock and colored in using the Watercolor Pencils and Blender Pens. Then cut him out and adhere him with Stampin' Dimensionals to the left of the punched out Key Tag.
You will then fill the cello bag with candy corn or whatever treats you'd like to give and attach that with Snail to the More Mustard Cardstock. Then take a piece of Autumn Vine Designer Series Paper and fold it over the More Mustard Bag. Punch out 2 holes with the Crop-A-Dile and thread a piece of Rope Twine through to keep the bag closed. After tying it up, I tied a knot at each end of the Rope Twine and unraveled the twine. That's it!
All Supplies Stampin' Up!
Stamps: Happy Blessings
Ink: Basic Brown, More Mustard
Paper: More Mustard, Whisper White, Autumn Vine Designer Series Paper
Accessories: Watercolor Pencils, Blender Pens, Crop-A-Dile, Key Tag Punch, Small Cello Bag, Stampin' Dimensionals, Scoring Tool


This festive card uses the Sentiment from the Elegant Cheer Set and the Tree from the Scandinavian Season Set in the Holiday Mini. The card base is made out of Riding Hood Red Cardstock. I didn't take a picture of the inside of the card, but I took the Scandinavian Wheel and rolled it down the center of the inside of the card. The tree was stamped in Always Artichoke ink onto Very Vanilla Cardstock and colored parts of the tree with a Blender Pen and Riding Hood Red Ink. The tree is next attached to a piece of Riding Hood Red Cardstock and then added two Red Square Rhinestones (small and large) on the tree. Then I attached the Riding Hood Red Striped Ribbon to the left of the Always Artichoke piece of Cardstock and used Snail to attach it to the back of the Always Artichoke Cardstock. Then I attached the tree to the Always Artichoke piece. Next, I stamped the Holiday Cheer Sentiment in Riding Hood Red onto a scrap of Very Vanilla Cardstock and punched it using the Designer Label Punch. I then took the Vanilla Hodgepodge frame and lay it over the Sentiment and attached the brads to the frame and cardstock. I then Snailed this onto the Artichoke Cardstock and attached the entire piece to the Riding Hood Red Cardstock.
All Supplies Stampin' Up!
Stamps: Scandinavian Season, Scandinavian Wheel, Elegant Cheer
Ink: Always Artichoke, Riding Hood Red, Always Artichoke ink cartridge
Paper: Very Vanilla, Always Artichoke, Riding Hood Red
Accessories: 1-1/4" Riding Hood Red/Vanilla Striped Grosgrain Ribbon, Vanilla Hodgepodge Frame, Ice Square Rhinestone Brads (Red), Blender Pens, Designer Label Punch, Paper Piercing Tool
Okay I think that's all for today! I have two more projects to share with you also from this Holiday Mini Class but it's getting late and I'm tired, had a long day... (work and then a staff meeting). Plus, I have to prepare for a workshop on Saturday and my Christmas Stamp-A-Stack on Sunday.
Thanks for stopping by today and Happy Stampin'!
My 2nd Signature

Christmas Stamp-A-Stack

Hi Stampers!

This Sunday, Nov. 16 I will be having my First Annual Christmas Stamp-A-Stack! We will be making 10 cards, 2 each of 5 designs for $20. Get a jump start on your Christmas/Holiday Cardmaking and have some fun, eat some yummy treats and win some door prizes! If you are in the Los Angeles area and would like to attend, contact me for more information. If you are unable to attend but would still like to make the projects let me know and I can send you the supplies you need for $20 plus the shipping fee!

Happy Stampin'!
My 2nd Signature

Wednesday, November 12, 2008

Holiday Gift Giving
With the Stampin' Up! Holiday Gift Guide you can find all the gifts you need without breaking the bank! The guide is divided into different categories to help you find the right gift(s) within your budget. Click on the picture below for more details. Feel free to contact me to place an order or if you have any questions!


Happy Stampin'!
My 2nd Signature

Rub-On Some Holiday Cheer

Hi Stampers! From now until Nov. 30 you can save 20% OFF all the rub-ons when you spend $20 in merchandise. You pay $8.76 per package instead of the regular price of $10.95! This includes the rub-ons in the Fall/Winter 2008 Catalog, Celebrando Creatividad and the Holiday Mini Catalog! These rub-ons are great and easy to use. You can use them to make quick and fast cards, 3-D Projects and Scrapbook Pages. Click on the image below for more details.

As always, contact me if you have any questions!


My 2nd Signature

Halloween Goodies, Finally...

Hi Stampers! As promised here are the Halloween Goodies I made for some friends as well as for the children and some of the teachers at the school I work at. Again, I apologize for taking so long to get these posted but better late than never! All the projects were so quick and easy to do, if you'd like more details on any of the items feel free to email me and I'll give you the info. you need. Enjoy!


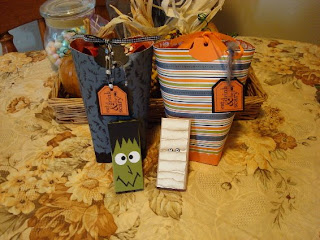
The Bags I made above are actually called, Box in a Bag. They come together so fast using Designer Series Paper and cardstock. For these, I used the Ghostly Greetings Designer Series Paper, Pumpkin Pie and Basic Black Cardstock. The image is from the Eat, Drink and Be Scary set available in the Holiday Mini Catalog. It was stamped using Basic Black in onto Pumpkin Pie Cardstock and punched out with the Small Tag Punch. The Basic Black layer is punched out using the Tag Punch. I then used the Round Tab Punch to punch the "handles" for each bag out of Basic Black and Pumpkin Pie Cardstock. I used the Black Grosgrain and Only Orange Grosgrain Ribbon to tie the bags closed. Oh, and I attached the tags to the ribbon using Fibers that are no longer available through Stampin' Up! Directions on how to assemble these bags can be found at Inking Addict. Scroll down towards the end of this post for details on how to make the candy bar wrappers!

All Supplies Stampin' Up!
Stamps: Eat, Drink and Be Scary
Ink: Basic Black
Paper: Ghostly Greetings Designer Series Paper, Basic Black, Pumpkin Pie
Accessories: Black Grosgrain Ribbon, Only Orange Grosgrain Ribbon, Fibers, Crop-A-Dile, Round Tab Punch, Tag Punch, Small Tag Punch, Scallop Edge Punch, Sticky Strip


This is a group picture of the goodies I made for the children from my school. We have a "No Candy" policy so the chocolate bars went to the teachers and the bags and pencils went to the children.


The Cello bags were made using the Medium Flat Cello bags and sealed with the topper made out of Pumpking Pie and Basic Black Cardstock. Again the tag was made using the Eat, Drink and Be Scary set from the Holiday Mini. I stamped the witches hat, onto Whisper White Cardstock using Basic Black ink and cut out then attached with Stampin Dimensionals. Like I said before, our school has a "No Candy" policy so the treat bags included Teddy Grahams, Play-Doh, a bug and some Halloween Shaped Marshmallows. The children and parents loved them!

All Supplies Stampin' Up!
Stamps: Eat, Drink and Be Scary
Ink: Basic Black
Paper: Basic Black, Pumpkin Pie
Accessories: Small Tag Punch, Tag Punch, Stampin' Dimensionals, Paper Snips, Medium Flat Cello Bags


These adorable pencil holders were CASEd from Jamie Sears' blog, Stamping Mommy of 4. I had to change my measurements because hers is for 3 pencils and I was only going to include 1 pencil for each child. Aren't they great? And again, they are so easy to make! I got the pencils at Walmart, I think they were 10 pencils in a pack for $1! Once again, I used the Ghostly Greetings Designer Series Paper and Basic Black Cardstock. The pouch is sealed closed using 2 brads on each corner, which were hidden by tying a ribbon around the pouch using the Only Orange Grosgrain Ribbon. Then just take your pencil and tuck it in the pouch and it's done!


All Supplies Stampin' Up!
Stamps: None
Ink: None
Paper: Ghostly Greetings Designer Series Paper, Basic Black
Accessories: Only Orange Grosgrain Ribbon, Silver Mini Deco Fasteners, Paper Piercer


And lastly, one of the funnest projects I made were these Frankenstein and Mummy Candy Bar Wrappers! I just love the way they turned out! And tucked in each one is either a fun size Kit Kat Bar or Hershey's Bar! I got the idea and instructions from again, the fabulous Angie Juda at ChicNScratch. Thanks for the idea Angie! The tutorial for the Mummy can be found here, and for Frankenstein here.

The Frankenstein is made out of Old Olive Cardstock and the hair using Basic Black Cardstock. I cut his hair out myself, just used the Paper Snips and cut jagged lines of different lengths. Very Easy. I drew in the nose and mouth using a Basic Black Stampin' Write Marker. The eyes were made by punchin out the circles from Whisper White Cardstock using the 1/2" Circle Punch and punching out circles from Basic Black Cardstock using the 1/4" Circle Punch.

For the Mummy, I used Creamy Caramel and Very Vanilla Cardstock. The Very Vanilla is torn into different sized strips and sponged with Creamy Caramel Ink to give it an aged look. The eyes are made out of Whisper White and Basic Black Cardstock using the 1/8" and 1/4" Circle Punches.

All Supplies Stampin' Up!
Stamps:
None
Ink: Creamy Caramel
Paper: Old Olive, Creamy Caramel, Whisper White, Very Vanilla, Basic Black
Accessories: 1/2" Circle Punch, 1/8" Circle Punch, 1/4" Circle Punch, Paper Snips, Basic Black Stampin' Write Marker, Stampin' Sponge

Phew! Well, that's it. I hope you enjoyed looking at my samples. Stay tuned tomorrow for some more samples from a Holiday Mini Class I participated in. Until then, Happy Stampin'!

My 2nd Signature

Tuesday, November 11, 2008

Halloween Treats Class

Hi Stampers! I first want to apologize for the lack of posts this last week or so. As you know from my last post, I was sick (food poisoning) and just did not have th energy to post or stamp. Then, on Thursday I had to fly out to Dallas, TX for the NAEYC Conference and was gone through Sunday. I was hoping to get some stamping done and post on my blog but life got in the way as it tends to. So again I apologize and I do still have some of the Halloween treats that I made for some friends, teachers and the children at my school.

Today I'll be sharing some projects that I made through the Halloween Treats Class that the wonderful Angie Juda had available over at ChicNScratch. I love her blog, so do check it out when you get the chance! The projects were so much fun and easy to make, I had a blast! Hope you enjoy viewing them as much as I enjoyed making them!


Here is a group shot of the projects that I made. Angie also had a Peppermint Patty Halloween Sandwich project and matching Cello Bag but as crazy as this sounds, I could not find any of the Peppermint Patties anywhere! I looked and looked, and found some square ones but not the round ones, which are what I needed. Well, if I find them I will make the final project and post it here. (crossing my fingers) Aren't the projects just great! I love the Frankenstein box!

Here's Frankie! He is so stinkin' cute I can't stand it! I had a blast making this box, and it came together quick and easy too! Now Angie provided all the supplies needed to create the projects (paper, accessories, etc.) but not the stamped images since it is against Stampin' Up! policy to do so. For the Frankie Box she even provided the wire for the handle!

Okay now for the details: the box is made out of Kiwi Kiss cardstock and the hair is made using Basic Black textured cardstock. The hair was provided already cut, but I believe Angie uses a scrapbooking template to cut the hair. If you wanted to, you could just as easily cut the hair freehand making sure to make jagged, long and short cuts. The white of the eyes is punched with the 1" circle punch out of Whisper White cardstock. The eyelids and nose are also punched with the 1" circle punch using Kiwi Kiss cardstock. Lastly, the black part of the eyes is punched using the 3/4" circle punch out of Basic Black cardstock. I adhered the eyelids and nose with Stampin' Dimensionals, songed some Basic Black ink on them. Then I used the Signo White Gel Pen to make the eye accents. I recommend using Sticky Strip to assemble the box, to ensure that it doesn't come apart. The last step is to punch 1/8" circles on either side of the box, twist the wire around a pencil, pull it through and using wire pliers bend the ends. OH, I almost forgot his mouth! I used the Basick Black Stampin' Write marker to make his mouth, which is basically a "W". Quick and easy don't you think?!


All supplies Stampin' Up! (unless otherwise noted):
Stamps:
None
Ink: Basic Black
Paper: Kiwi Kiss, Basic Black Textured Cardstock, Whisper White
Accessories: 1" Circle Punch, 3/4" Circle Punch, 1/8" Circle Punch, Basic Black Stampin' Write Marker, Signo White Gel Pen, Stampin' Dimensionals, Stampin' Sponge, Wire pliers and Rebar Wire (non-Stampin' Up!)


The final two projects were the Pillow Box and the Basket. Both items were made using the Big Shot and the Pillow Box die and the Baskets and Blooms Die. The Ghostly Greetings Designer Series Paper was also used for both projects. Again they came together rather quickly. For the tag on the Pillow Box you will need to punch out the large tag out of Basic Gray cardstock and the smaller tag out of Whisper White Cardstock. Before punching out the small tag, you will need to stamp your image from the Eat, Drink and Be Scary set. You will need to color in the image using Old Olive, Pumpkin Pie and Basic Black Stampin' Write markers, and then stamp unto the Whisper White. Once this is done, you will take your Small Tag Punch, line it up and punch. I then used my Crop-A-Dile to punch a hole at the edge of the tag and adhered a brad. Use black thread to attach the tag to the Basic Gray Taffeta Ribbon around the pillow box. Again use sticky strip when putting together the pillow box to make sure it stays together. Also, make sure you fill the box with your goodies before sealing it up the ends!

The Basket has no stamping required! You just run the die through the Big Shot using the Basket and Blooms Die and Ghostly Greetings Designer Series Paper and assemble. Of course, remember to use Sticky Strip. Then add the Basic Gray Taffeta Ribbon, add your goodies and you're done! How quick is that?!

Oh, I almost forgot about the test tube! This was provided for us and I believe Angie bought them at Michael's they are from Martha Stewart and were available during Halloween. I'm not sure if they are still available. You just basically stamp your image from the Batty For You stamp set, onto Whisper White Cardstock using Green Galore ink and punch it out with the 1" Circle Punch. Then stamp the image again onto Green Galore cardstock using Basic Black ink and punch this out using the 1-3/8" Circle Punch. Attach the Frankenstein image onto the Green Galore circle and punch out a Scallop Circle out of Basic Black cardstock. Attach the first two layers onto the Scallop Circle using Stamin' Dimensionals. Take your Paper Piercing Tool and pierce holes in the center of each scallop. Then thread through the Black Grosgrain Ribbon, tie it around the test tube and voila! All that's left is to fill them with your goodies. I filled mine with M&M's but forgot to take a picture of it. Sorry!

All Supplies Stampin' Up! (unless otherwise noted)-Pillow Box and Basket:
Stamps: Eat, Drink and Be Scary
Ink: Basic Black, Pumpkin Pie and Old Olive Stampin' Write Marker
Paper: Basic Gray, Whisper White, Ghostly Greetings Designer Series Paper
Accessories: Pillow Box Big Shot Die, Baskets and Blooms Big Shot Die, Big Shot, Small and Large Tag Punch, Crop-A-Dile, Black eyelets, Black thread, Basic Gray Taffeta Ribbon

All supplies Stampin' Up! (unless otherwise noted)-Test Tube:
Stamps: Batty For You
Ink: Basic Black, Green Galore
Paper: Basic Black, Green Galore, Whisper White
Accessories: 1" Circle Punch, 1-3/8" Circle Punch, Scallop Circle Punch, Black Grosgrain Ribbon, Paper Piercer, Stampin' Dimensionals, Test Tube (non-Stampin' Up!)

Well, that's it for tonight! Happy Stampin'!

My 2nd Signature

Monday, November 3, 2008

Sorry for the Delay

Hi Stampers,
I know I promised you pictures of the Halloween Goodies I made but I got sick on Saturday (I'm thinking it was food poisoning) and spent Saturday night and all of Sunday either in bed or over the sink (if you get my drift). I'll spare you the gross details.

I am feeling better today but not well enough to include detailed posts with pictures. I hope to be able to do that either tomorrow or Wednesday. Till then, check out the new promotions Stampin' Up! has for the month of November. You can find the flyers on the right.

Happy Stampin'.

My 2nd Signature

Saturday, November 1, 2008

Happy Halloween!!

Happy Halloween everyone! I can't believe it's Halloween and the end of October already! This is my most favorite holiday and I love making goodies and decorating for the occasion. I did not have time today to post all the Halloween goodies I made but I will soon I promise. For now enjoy this Halloween Celebration video, Stampin' Up! style!


Happy Stampin' and have a Safe and Happy Halloween!!