Tuesday, April 27, 2010

March Workshop Cards- Part 3

Hi Stampers!

Here is the 3rd and final card from my March Workshop. I think this one was my favorite of the three. I'll let you judge for yourself...


So what do you think, isn't it gorgeous!? I love the glitter on the paper (already comes like that!) and the delicate embossing on the butterflies! Plus, the colors all work good together as well. The background paper is from the oh so beautiful Sending Love Designer Series Paper that is available from the Occasion Mini Catalog until the end of April. You do not want to miss out on ordering this paper, it is gorgeous!

The edge on the Chocolate Chip Cardstock strip was made using Scallop Trim Border Punch that you were able to earn for FREE during Sale-A-Bration. The Pretty In Pink Corduroy Buttons look great with a piece of linen thread tied through it doesn't it? And the Happy Birthday sentiment is from the Well Scripted stamp set (Occasions Mini) and is stamped in Chocolate Chip.


Here's a close-up of the butterflies and the paper. If you can't really see the glitter on the DSP, I apologize. But trust me it is beautiful in real life! I love, love, love the Stampin' Up! Beautiful Wings Embosslits Die. It's so easy to use and it cuts out the butterflies and embosses them at the same time! The gals loved when they saw how this work and how easy it was!


All Supplies Stampin' Up! (unless otherwise indicated)
Stamps:
Well Scripted
Ink: Chocolate Chip
Paper: Pretty In Pink, Sahara Sand, Very Vanilla, Chocolate Chip, Sending Love Specialty Designer Series Paper
Accessories: Scallop Trim Border Punch, Pretty In Pink Corduroy Buttons, Stampin' Up! Beautiful Wings Embosslit, Stampin' Dimensionals, Pop-Up Glue Dots, Linen Thread, Big Shot


Have a great day and Happy Stampin'!

Monday, April 26, 2010

March Workshop Cards- Part 2

Good Evening Stampers!

I know I was supposed to post these pictures last Friday but I had the Spring Event Dinner and Auction at work so I had not time to post. I apologize for that! However, the event was a lot of fun and we raised lots of money for our Scholarship Fund. Yahoo! :o)

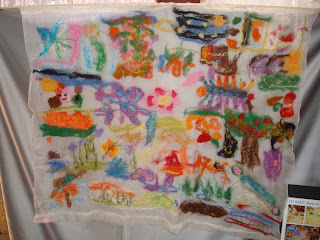
Here's a picture of the yard art that the children in my class worked on. Each yard made their own work of art that was also part of the items to bid on at the aurction. This is a tapestry that was made through a process called Nuno Felting. It uses raw wool and silk and is super easy and lots of fun to do. The children loved it!


First they drew pictures that were inspired by their environment at school (notice the tree) as well as from their imagination or "inside their head" as they like to say. After that their drawings were transferred to the silk and they got to it reproducing their drawings out of silk and wool. Isn't it beautiful, I was so proud of them! :o)

Alright, and now on to the card!


Here's a birthday card that I think would be perfect for that special man in your life. I really like the color combinations and the simplicity yet elegance. The background is made out of paper from the Sweet Pea Designer Series Paper Stack and will be very sad to see it go at the end of this month! I punched out 1-1/4" Squares out of different pieces of the DSP and just decided which side to use, since all of our DSP is double-sided! ;o) The squares were then adhered to a piece of Pumpkin Pie Cardstock that was then layered onto the So Saffron Card base. Super easy right?


Here is a close up of the "faux bow" and the sentiment. Both the "Happy Birthday" and the label are from the Sale-A-Bration Set Vintage Labels. The Oval label was stamped in Chocolate Chip Classic Ink and punched out using the Large Oval Punch. The sentiment was stamped in Take with Teal Classic Ink. As you can see, all of the colors come straight from the DSP itself so everything coordinates. How great is that? ;o)


All Supplies Stampin' Up! (unless otherwise indicated)
Stamps:
Vintage Labels
Ink: Chocolate Chip, Taken with Teal
Paper: So Saffron, Pumpkin Pie, Sweet Pea Designer Series Paper Stack
Accessories: Large Oval Punch, 1-1/4" Square Punch, 5/8" Chocolate Chip Grosgrain Ribbon, Stampin' Dimensionals


That's all for tonight! Stay tuned tomorrow for the last card from the workshop and Happy Stampin'.

Quick reminder, April 30th is the last day to order from the Occasions Mini Catalog so be sure to get what you "need" before it's too late! You can always order by going HERE or EMAIL ME or you can call me. If you have any questions or need help feel free to CONTACT ME at any time!

Wednesday, April 21, 2010

March Workshop Cards- Part 1

Hi Stampers!

Tonight I'm sharing three cards we made for a workshop I had back in March. I know, I know, I'm late in posting this. But better late than never right? My friend Angelica had a workshop at her house and although only 4 out of the 10 people that had confirmed showed up, it was a very successful workshop. Unfortunately, like a big spaz, I forgot to take pictures of everyone. :o( But trust me they had fun, and her Mom enjoyed it so much as well! :o)


Okay, these are the beautiful cards that my upline Yolie helped me out with. Aren't they great? I really liked every one of them, and they were all pretty quick to put together as well. Enjoy!


Isn't this card great?! I really liked the color combination and layout. Very clean and elegant, I think!


Here's a close-up of the paper flower that we made. It was so quick and easy to make, I couldn't believe it! The ladies were all impressed at it's simplicity as well! Patty Bennett has a great video tutorial that shows you exactly how to make this flower. You can see it by clicking HERE! The background on the Kraft Cardstock was made using the NEW Stampin' Up! Perfect Polka Dots Impressions Folder and the Big Shot. Doesn't it look nice!


All Supplies Stampin' Up!
Stamps: With All My Heart
Paper: Whisper White, Kraft, Sending Love Specialty Designer Series Paper
Ink: Real Red
Accessories: Real Red Corduroy Buttons, Real Red 5/8" Satin Ribbon, 1" Circle Punch, Eyelet Border Punch, Crimper, Paper Piercing Tool, Mat Pack, Sticky Strip, Perfect Polka Dots Impressions Folder, Big Shot

I'll post a picture and details for card #2 tomorrow. Have a great night and Happy Stampin'!

Tuesday, April 20, 2010

April Thank You Cards

Good Evening Stampers!

Today I'm sharing a Thank You card that all customers will be receiving with their orders this month. I CASEd it from another talented stamper but unfortunately I don't remember who it was! :o( If you happen to recognize this card and know who it belongs to, please let me know so I can give appropriate credit to them. Thanks!


All Supplies Stampin' Up!
Stamps: Razzle Dazzle, Upsy Daisy, Circle Circus
Ink: Rich Razzleberry
Paper: Whisper White, Naturals
Accessories: Scallop Circle Punch, 1-3/4" Circle Punch, 1-1/4" Circle Punch, 1" Circle Punch, Stampin' Dimensionals, Stampin' Sponge

Click HERE to place an order 24/7 or EMAIL ME.


Have a great Night and Happy Stampin'!

Saturday, April 17, 2010

Two-Step Into Spring!


Two-Step into Spring Promotion

Promotion Dates: April 1-30, 2010

Promotion Details

Hostesses
Host a $350 workshop and receive the brand-new Two-Step Awash with Flowers stamp set FREE!

Item Description
117062 Awash with Flowers (wood-mount)
120549 Awash with Flowers (clear-mount)

Customers
Two-Step into spring with a sneak peek from the 2010-2011 Idea Book & Catalog! Be the first to add the Awash with Flowers stamp set to your collection.

Item Description Price
117062 Awash with Flowers (wood-mount) $39.95
120549 Awash with Flowers (clear-mount) $27.95

Plus, purchase spring-themed Two-Step Stampin' sets at 20 % OFF the retail price--no additional purchase necessary!

Qualifying stamp sets are listed below:

Item Page Description Discount Price
113824 94 Greenhouse Garden $20.76
113734 98 Fifth Avenue Floral $19.96
111578 101 Flower Fancy $29.56
113258 112 Trendy Trees $14.36


If you have any questions, feel free to EMAIL ME. As always, you can place an order 24/7 by CLICKING HERE. Remember, this is the last month to order from the Occasions Mini Catalog, so be sure to get the products you want and love before they're gone!

Have a great Saturday and Happy Stampin'!

Tuesday, April 6, 2010

Crystal's Diaper Cake

Good Evening Stampers!

I know I have been MIA for several weeks now but it has been rough for me health wise lately. I've been getting sick a lot lately and often feel tired when I get home from work. So I apologize for not keeping up with my daily posts. I am determined to get better with this, I promise!

Today I am sharing a diaper cake I made for my cousins Will and Crystal's Baby Shower. They are expecting their first baby girl, Emily Kaylin. We are all very excited and can't wait for her to make her appearance in this world! :o) This was my very first time making a diaper cake and I think it came out great, and both Crystal and Will loved it, which is what mattered most!


Here's a picture of the beautiful Mom-To-Be Crystal with the Diaper Cake I made for her. Doesn't she look radiant, with that mommy glow? I can't believe that Baby Emily is due in 6 more days, how exciting! :o)


Here's a picture of the Diaper Cake. The theme for Emily's room is butterflies and the colors are pinks and greens. So in keeping with that theme I chose the retired Raspberry Tart Designer Series Paper and Pretty In Pink Cardstock.


This is a close-up of the topper. Isn't she cute? I found her at Starbuck's and thought her outfit would be perfect for the top of the cake, she coordinated perfectly!


A close-up of the bottom 2 layers.

And lastly, a close-up of the top layer and the butterflies. Aren't the butterflies just beautiful? I used the NEW Stampin' Up! Beautiful Wings Embosslits Die for the Big Shot. I love how it cuts out four different sized butterflies and embosses them as well! Isn't that great?! The Pretty in Pink CS is has a beautiful border that was punched out using the NEW Scallop Border Punch that was FREE last month during Sale-A-Bration.

Well, I hope you enjoyed looking at the Diaper Cake, that to be honest I am very proud of! All in all I used 72 diapers (newborn sized) to complete the three tiers for the cake. To be honest, that was the most tedious part: rolling up and tying rubberbands around each individual diaper! The rest of the cake came together easily, and beautifully I might add...;o)

That's all for today Stampers, I'll be sure to post pictures of Baby Emily when she arrives! Have a great night and Happy Stampin'!