Showing posts with label Workshop Projects. Show all posts

Wednesday, August 10, 2011

Yolie's August Hostess Club Projects

Hi Stampers! Today I'm sharing the projects that we did at Yolie's house last weekend for her August Hostess Club. These were so much fun to make, I look forward to her club every month. =) Enjoy!


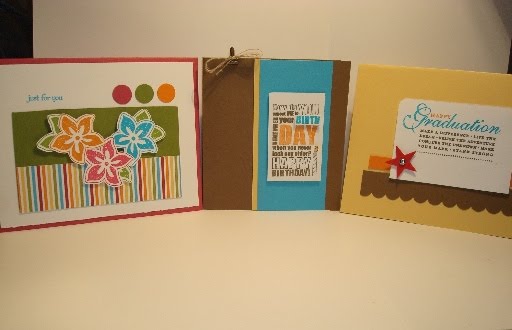
Here is a picture of all three cards we made.


The first card was so quick and easy! Just stamping and then coloring in with sponge daubers to give the card that popping color! So love the result. The trick for this card is that the flowers are stamped onto glossy cardstock instead of the regular cardstock. That allows the colors to pop and be more vibrant. The stamp set we used Flower Fest from the Idea Book & Catalog. This set is great because 5 out of the 8 images all coordinate with 5 of our punches, making it easy to punch out and use the images on your projects. I love when I can use a punch instead of cutting out by hand, don't you?


Stampin' Supplies (all supplies are Stampin' Up! unless otherwise indicated):
Stamps:
Flower Fest (122280)
Paper: Glossy White (102599), Daffodil Delight (119683), Pacific Point (113350)
Ink: Basic Black (101179), Daffodil Delight (119667), Pacific Point (111837), Old Olive (102277)
Accessories: Old Olive 5/8" Satin Ribbon (117292), Sponge Daubers (102892)


I fell in love with this tag and/or card holder as soon as I saw it! It was CASEd from Mary Fish of the Stampin' Pretty blog. It was another quick project and the result is so beautiful! The stamp set and Designer Series Paper are originally from the Summer Mini Catalog, but they are also some of the items that made it in to the Idea Book & Catalog. So happy about that! Unfortunaely, the sentiment is from the Happy Greetings stamp set, also from the mini, but it did not make it into the catalog. :( So make sure you order it before Aug. 31 if you really NEED it! ;) The clothespins were easily decorated by simply gluing on some strips of DSP onto each one and then sanding around the edges. What a great idea!


Stampin' Supplies (all supplies are Stampin' Up! unless otherwise indicated):
Stamps:
Fabulous Florets (123027), Happy Greetings (123313)
Paper: Soft Suede (115318), Whisper White (100730), Tangerine Tango (111349), Melon Mambo (115320), Daffodil Delight (119683), Pacific Point (111350), Old Olive (100702)
Ink: Soft Suede (115657), Daffodil Delight (119667)
Accessories: Silver Mini Brads (122941), Basic Rhinestones (119246), Stamping Sponges (101610), Multipurpose Liquid Glue (110755), Paper Piercing Tool (116631), Mat Pack (105826), Itty Bitty Shapes Punch Pack (118309) So Saffron 3/8" Taffeta Ribbon (122982), Wooden Clothes Pins (non-Stampin' Up!)


This is the last card we made. I think this was my favorite by far because...


...it opens up to reveal a gift card! How cool is that?! =D I loved this idea and how the Top Note Die was used to make this gift card holder. As with most of the projects, it was super quick and easy to make, but the result is stunning! The technique used to shade in the flower is called "Thumping" and it was so quick and I loved the end result as I'm sure you will too. And if you look closely, the brad is one of the NEW DSP brads that just came out. I LOVE these new brads, they are so pretty! The ribbon is also our NEW ruffled ribbon which of course, I LOVE! ;) This card was inspired by Dawn Griffith of Dawn's Stampin' Thoughts.


Stampin' Supplies (all supplies are Stampin' Up! unless otherwise indicated):
Stamps:
Flower Fest (122280), Bring on the Cake (121958)
Paper: Pool Party (122924), Island Indigo (122923), Whisper White (100730), 2011-2013 In Color Patterns Designer Series Paper Stack (122384)
Ink: Island Indigo (122937)
Accessories: Paper Piercing Tool (116631), Mat Pack (105826), Pool Party 3/8" Ruffled Ribbon (122975), Designer Printed Brads (122940), Stampin' Dimensionals (104430), 2-3/8" Scallop Circle Punch (118874), 2-1/2" Circle Punch (120906) Word Window Punch (119857) Big Shot (113439), Top Note Bigz Die (113463), Sticky Strip (104294)


FYI: I will be having a workshop in my home on Aug. 25 from 2-4pm. We will be making the projects shown above, with some variations in colors. If you would like to attend and are not on my mailing list, please contact me. I hope you enjoyed viewing this cards today and that they have inspired to get some stamping done. Have a great day and Happy Stampin'!

*************************************************************************************

Priscilla's Reminders:
  • August 31st is the last day to place an order from the Summer Mini Catalog. So if you've been on the fence about any particular products, act now before it's gone!
  • August 31st is also the last day for the Buy 3, Get 1 Free Designer Series Promotion.
  • Stampin' Up! will donate $2* from the sale of each Strength & Hope set and Strength & Hope digital kit to The Breast Cancer Research Foundation (BCRF) through the end of August.
  • Place an order online, 24/7 by clicking here.
  • Contact me anytime.

Tuesday, August 9, 2011

July Workshop Projects

Hi Stampers!
I know, I know...haven't updated my poor neglected blog in MONTHS. I apologize for that but things got crazy with the end of the school year, work, and family matters. The last 2 months were very emotional for me and I apologize for my absence and neglect of my blog. To be honest, I hadn't stamped in months because I felt as if I had lost my Stampin' Mojo...but thankfully it's back!

I went into pending status as a demonstrator but did have a workshop at the end of July and that helped me regain my status. I definitely don't want to quit doing what I job so I will try to dedicate a lot more time to my stamping and my Stampin' Up! business. Thanks to all of you who have stood by me through it all, I really appreciate you. =)

Okay, so on to the projects. We made three cards using sets from the current Summer Mini Catalog and the NEW 2011-2012 Idea Book and Catalog. If you haven't seen it yet and want your own copy, make sure you contact me and I'll get one out to you. It's so lovely! ;)


Here is a group shot of the three cards that we made.


This is the first card. I really liked how so many stampers were using the clear blocks as background images so I decided to do the same. I think it looks good. This type of card is known as CAS (Clean And Simple), and it is my favorite card to make when I'm in hurry. And the ladies who attended loved it too. =) The set we used is the Strength & Hope Set from the Summer Mini Catalog. I think this set is really beautiful, and right now Stampin' Up! is donating $2 from each set that is sold to the Breast Cancer Research foundation, through the end of August. The clear block was stamped using one of the new In Colors, Pool Party. The butterfly and sentiment were both stamped in Early Espresso. That's it, easy peasy lemon squeezy. ;)


Stampin' Supplies (All supplies are Stampin' Up! unless otherwise indicated)
Stamps:
Strength & Hope (123660)
Paper: Whisper White (100730)
Ink: Pool Party (122938) Early Espresso (119670)
Accessories: Clear Block "D" (118485)


This next card was also quick and easy to do because it uses one of our 3 Simply Sent Kits. I love these kits because they come with all the supplies you need to create 8 beautiful cards! All you need to supply is the adhesive and the sentiment, but there are also coordinating sentiments that you can purchase separately. This one is the Simply Sent Great Day Kit and the sentiment we used is from the It's Your Day stamp set that coordinates. It includes all the items that you see on the card above plus some Whisper White flower buttons which I didn't use but my customers did. It's just a matter of preference. All I added to the card was the Rich Razzleberry flower that I popped up with dimensionals, the Bashful Blue flower that is also popped up, the Rich Razzleberry scallop border and the Bashful Blue grosgrain ribbon. The accents (flowers and border) are all self-adhesive accents that come with the kit. The ribbon is included as well, and the circles are all pre-printed on the Whisper White cardstock. Love it!


Stampin' Supplies (all supplies are Stampin' Up! unless otherwise indicated):
Stamps:
It's Your Day (123682)
Paper: None
Ink: Old Olive (102277)
Accessories: Simply Sent Great Day (122375), Stampin' Dimensionals (104430), SNAIL (104332)


And here is the last card. This card I actually CASEd straight out of the Summer Mini Catalog. It also uses the Fabulous Florets from the Mini as well. The only differences from my card and the one in the mini are that I didn't do the tone on tone flowers in the background and I added the piercing along the bottom edge. In the sample card, they actually sewed the border. But I still think it looks great! I especially love the color combos of Daffodil Delight, Pacific Point Blue, Tangerine Tango, and Melon Mambo. This makes a very bright and cheerful card. =D


Stampin' Supplies (all supplies are Stampin' Up! unless otherwise indicated):
Stamps:
Fabulous Florets (123027)
Paper: Whisper White (100730), Daffodil Delight (119683), Pacific Point (111350)
Ink: Melon Mambo (115656), Tangerine Tango (111834), Pacific Point (111837), Wild Wasabi (109014)
Accessories: Scallop Edge Border Punch (119882), Paper Piercing Tool (116631), Mat Pack (105826)


Well, that's all for today. I hope you enjoyed the cards, and stay tuned tomorrow for the cards I'll be sharing which we made at my Yolie's (my upline) house last weekend for her Hostess Club. If you are interested in attending any of my workshops or hosting your own, feel free to contact me. Have a great day and Happy Stampin'!


*************************************************************************************

Priscilla's Reminders:
  • August 31st is the last day to place an order from the Summer Mini Catalog. So if you've been on the fence about any particular products, act now before it's gone!
  • August 31st is also the last day for the Buy 3, Get 1 Free Designer Series Promotion.
  • Stampin' Up! will donate $2* from the sale of each Strength & Hope set and Strength & Hope digital kit to The Breast Cancer Research Foundation (BCRF) through the end of August.
  • Place an order online, 24/7 by clicking here.
  • Contact me anytime.

Tuesday, November 30, 2010

Vintage Christmas Stamp Camp

Hi Stampers,
Please join me for a Vintage Christmas Stamp Camp. We will be making 4 standard-sized cards and a custom designed Vintage Christmas box. If you would like to make more cards let me know so that I have enough supplies for you.

Also, as this is a stamp camp I will require payment before the date of the event. The cost will be $25 per person, which will include all the supplies you will need to complete the cards and box. If you'd like to make extra cards, the cost is $35 per person. Your payment will guarantee a spot in the class.

Because I will need to order all the supplies, I will need payment NO LATER THAN FRIDAY, DEC. 3 by 5pm. I'm sorry for the short notice but in order for me to receive the needed supplies on time I need to make sure to order them by Friday.

As always, please be sure to bring your own SNAIL or similar type of adhesive and feel free to invite a friend (s).


Happy Stampin'


Monday, July 12, 2010

Yolie's July Workshop- Part 1

Good morning stampers!

For the next few days I'll be sharing some cards that were made at Yolie's House! All three cards use NEW goodies from the NEW 2010-2011 Stampin' Up! Catalog! I loved all three cards and the color combos and I hope you do too...


Here's a picture of all three projects. So what do you think?


And here's the first card we made. I loved it, so simple and quick but so elegant. At least in my opinion it is. ;o) This card uses the NEW color, Pear Pizazz. It's similar to Certainly Celery except that it's a shade darker. I love it, and believe me I am not a fan of the color green, so that's saying a lot! So the Pear Pizazz piece was layered onto the Whisper White Cardstock. Then we punched out four 1-1/4" squares out of the NEW Green House Gala Designer Series Paper. I love this new DSP and the colors, oh my gorgeous! These were adhered to a 1/8"x 1/8" square piece of Whisper White Cardstock.

Next, we stamped "My Friend" from the NEW Perfect Punches set with Chocolate Chip Ink onto Whisper White Cardstock and punched it out with the Curly Label Punch. Then we used the Boho Blossoms Punch and punched out the large flower out of Real Red Cardstock and 1" circle out of Pear Pizazz. These were attached with a large Rhinestone Brad and then attached to the corner of the My Friend with a dimensional.


Here is a close-up of the square piece with the My Friend and Rhinestone brad. Cute don't ya think? I believe that Yolie CASEd this card from Dawn Olchefske. You can see it on her blog here.


All Supplies Stampin' Up! (unless otherwise indicated)
Stamps:
Perfect Punches
Ink: Chocolate Chip
Paper: Whisper White, Pear Pizazz, Green House Gala Designer Series Paper
Accessories: Curly Label Punch, Boho Blossoms Punch, 1-1/4" Square Punch, 1" Circle Punch, Clear Rhinestone Brads, Real Red 5/8" Grosgrain Ribbon, Stampin' Dimensionals

Have a great day and Happy Stampin'!

Click HERE to place an order 24/7.
Email me HERE.


Tuesday, June 29, 2010

May Workshop Projects- Part 3

Good Evening Stampers!

As some of you may know, I have been nursing my cat Angel back to health for the past week and a half. Thankfully, he seems to finally be recovering from his illness. Slowly but surely he regaining his strength and energy. And today for the first time he was hanging out on the window sill, which believe me, it was a very happy sight to see! :o) Thanks so much for all the well wishes and kitty prayers, they were very much appreciated. <3


Here's a picture of my baby boy Angel. This was prior to his getting sick. As soon as he's feeling 100% I will post a picture of him again. Isn't he such a cutie pie? And a bed hog too! Hee,hee! :oD Thanks again for the well wishes!

Okay, now on to the final card from my last workshop:


Here's a Graduation card that was also CASED from the Summer Mini Catalog. Another quick and simple card that can easily altered to match the colors of any specific school or university. I love the simplicity of the card but it is still quite striking don't you think? This card uses the a la carte stamp, Happy Grad. It's a great deal at only $8.95 for the stamp! It was colored in using Soft Suede, Pumpkin Pie and Tempting Turquoise Stampin' Write Markers. The card base is out of So Saffron, the smaller strip of cardstock is Pumpkin Pie and the scallop piece is Soft Suede.

The star was punched out using the Small Star Punch and Real Red Cardstock. In the mini catalog, there is a Bitty Button in the center of the star. Mine were on backorder at the time of my workshop so I substituted it with a Mini Deco Fastener instead. But I actually like the way it looks with that better! Oh ya, I almost forgot that the top left corner of the Whisper White piece was rounded out with the Corner Rounder. Well, I hope you enjoyed looking at my projects! Later on this week I'll share a couple of scrapbook page spreads I made a couple of weeks ago...

All Supplies Stampin' Up! (unless otherwise indicated)
Stamps:
Happy Grad
Ink: Tempting Turquoise, Soft Suede, Pumpkin Pie Stampin' Write Markers
Paper: So Saffron, Whisper White, Soft Suede, Pumpkin Pie
Accessories: Mini Deco Fasteners, Small Star Punch, Stampin' Dimensionals, Paper Piercing Tool, Corner Rounder

Just a quick reminder that tomorrow is the LAST DAY to order from the 2009-2010 Idea Book and Catalog! So CLICK HERE to order from me directly 24/7 or EMAIL ME. You can find the Last Chance Lists on the side of my blog.

Thursday, June 24, 2010

May Workshop Projects- Part 2

Good Morning Stampers!!

I know I keep disappearing on you but my poor cat Angel has been feeling sick since Thursday of last week and I have been in and out of ER's and Vet offices since then. We have run lots of tests, X-rays, antibiotics and changes in diet. This last Vet seemed more optimistic than the others and gave Angel a new canned food diet specifically for Irritable Bowel Disease in Felines. He said to give it a week, along with the antibiotics, and if he doesn't improve then we will have to do an abdominal ultrasound. So please, please keep Angel and I in your thoughts and prayers...

Now, here's the second card we made at my workshop last month. It was a complete CASE from the Summer Mini Catalog! I really liked the way it turned out in real life. Some of the girls had not used the Stampin' Write Markers yet when stamping so they enjoyed this technique. ;o)


The colors are Soft Suede, Tempting Turquoise and So Saffron. The sentiment is a la carte stamp at the back of the mini catalog called, Birthday Block. It's a great deal at just $7.95! You can't beat that! :o) So what we did was color in the stamp with the Soft Suede Stampin' Write Marker except for the word "Day" that was colored in Pumpkin Pie. The word "birth" was colored in using Tempting Turquoise and cut out then popped out with a Stampin' Dimensional over the original stamped image. We also colored in the flame from the candle using So Saffron ink. The final touch was using the Mini Library Clip and tying a bow around it using the Linen Thread. That's it! I hope you enjoyed the card today.


All Supplies Stampin' Up! (unless otherwise indicated)
Stamps: Birthday Block
Ink:So Saffron, Soft Suede, Pumpkin Pie, Tempting Turquoise Stampin' Write Markers
Paper:Soft Suede, Tempting Turquoise, So Saffron, Whisper White
Accessories:Mini Library Clips, Linen Thread, Stampin' Dimensionals, Paper Snips


Here's a picture of my very handsome cat Angel, back in his happier, healthier days. He is 13 years old but does not look a day over 3! It has really affected me emotionally seeing him sick and sad but I am trying to remain optimistic and look forward to the day when he is once again sitting at my stamping desk and plopping himself on all my supplies! :o)


Reminder: June 30th is the last day to order from the 2009-2010 Stampin' Catalog and to order any of the retiring stamps and accessories so don't delay!


Click HERE to order 24/7. Email Me if you have any questions or to place an order...

Happy Stampin'!

Monday, June 14, 2010

May Workshop Projects-Part 1

Hi Stampers!
I know I have been absent for a few weeks but I apologize. I've had a crazy last few weeks or I should say month! Plus, with the end of the school year and the summer program starting, things have been hectic at work. I also got away for a weekend and went to Vegas, watched the Jabbawockeez perform and was surprised with tickets to go see The Beatles Love at The Mirage. If you've never seen it I highly recommend it. Especially if you love the music of The Beatles. Oh my goodness it was beautiful and engaging and just amazing!!

Okay, enough babbling and on to the projects. These were projects that we did at my Summer Mini Workshop in May. The projects were all CASEd from different places, so enjoy!


Here are the 3 projects together, aren't they great?


Here's the first card we made. It was a complete CASE from Connie Babbert. You can find her original card at her blog, Inskpired Treasures. If you look at her card the only differences are that I didn't use the brads in the center of the flowers or the Designer Label Punch for the sentiment because I don't have them. Hee,hee ;o) Isn't it a beautiful card? I love that the colors all play off from the strip of the Island Oasis Designer Series Paper. Oh ya, she also used the Polka Dot Impressions Folder on the Whisper White Cardstock and I did not.

The base of the card is Rose Red and then layered a piece of Whisper White Cardstock on top. I punched out three 1/2" circles out of Pumpkin Pie, Rose Red and Old Olive. The sentiment is from the Teeny Tiny Wishes stamp set. It was stamped in Tempting Turquoise and I used the Stamp-a-ma-jig for perfect placement!

The three flowers are from the NEW Tropical Party stamp set and were stamped in Rose Red, Pumpkin Pie, Tempting Turquoise. They were cut out and popped up with Dimensionals. For the leaves, I stamped a 4th flower in Old Olive and cut out the petals to be used as leaves! Wasn't Connie creative with that idea?! Lastly, I placed a piece of Old Olive cardstock directly above the piece of Island Oasis DSP. Tada, beautiful card finished! :o)


All Supplies Stampin' Up! (unless otherwise indicated)
Stamps: Tropical Party, Teeny Tiny Wishes
Ink: Old Olive, Rose Red, Pumpkin Pie, Tempting Turquoise
Paper: Whisper White, Old Olive, Rose Red, Island Oasis Designer Series Paper
Accessories: 1/2" Circle punch, Stamp-a-ma-jig, Stampin' Dimensionals

Just a quick reminder that you have until the end of the month to purchase any items from the last chance lists! Contact me if you'd like to order or if you have any questions.


Order from me 24/7 by clicking HERE.


Wednesday, May 26, 2010

April Workshop-Part 3

Hi Stampers!

Tonight I'll be sharing the last card that was made at the workshop last month. It showcases another way of making a flower using our punches and cardstock. I love, love this card and the colors. I can't wait to make some more cards like this one but with different sentiments. My "thanks" is a little crooked (didn't use the Stamp-A-Ma-Jig) so don't look too closely at that. LOL


The colors used for this card are all taken from the Cottage Wall Designer Series Paper itself. I think this is one of my favorite color combinations this year. It uses Rich Razzleberry (NEW In Color) and Old Olive. Aren't the colors just so rich and striking?


Here is a close-up of the flower that we made. Both the flowers and the leaves were made using the Five-Petal Flower Punch. The tip here (which freaked me out when I found out what we had to do, so bear with me ;o) ) is that you will punch out your flowers and then run them through the crimper about 6x and then crumple them up. Then, you will start to separate the Cardstock by peeling away *gasp* the two layers. I was truly afraid to do this at first but it was actually very easy and the resulting was beautiful! The leaves are done the exact same way. Lastly, we punched out a 1/2" circle out of the polka dotted Cottage Wall DSP and adhered it to a Build-A-Brad. This was then attached to the center of the flower and leaves then attached to the card with Stampin' Dimensionals. That's it. Easy right?


All Supplies Stampin' Up! (unless otherwise indicated)
Stamps:
Taffy Alphabet
Ink: Rich Razzleberry
Paper: Rich Razzleberry
Accessories: Cottage Wall Designer Series Paper, Build-A-Brad, Five-Petal Flower Punch, Corner Rounder Punch, Crimper, 1/4" Old Olive Grosgrain Ribbon, Stampin' Dimensionals


Happy Stampin' and have a great night!


EMAIL ME
if you have any questions.
CLICK HERE to order from me online 24/7.

Monday, March 1, 2010

Technique Hostess Club Projects

Good evening Stampers!

Sorry for the delay in posts but I haven't had the strength or energy to post or stamp for the past week. I had been out sick with Tonsillitis since Sunday of last week! I am finally feeling better, don't have all my energy back yet but I'm definitely feeling better...

Today, I'll be sharing some projects that we made last month at my upline Yolie's, house for her Technique Hostess Club. These projects were so quick and easy to make, my favorite kind!


This card showcases the brand new Sweet Pea Designer Series Paper Stack and the coordinating Sweet Pea Stitched Felt Flowers, which I love! These flowers add such a nice touch to your cards and you get 52 pieces in a pack for only $7.95! You can't beat that!! Let me apologize for the odd colors in the pictures. I didn't realize that they were so off. As soon as I can, I will re-take the pictures and re-post them. The "Happy Birthday" sentiment is from the Well Scripted set from the Occasions Mini Catalog. The card base is actually Old Olive, though in the picture it looks like Always Artichoke. A piece of the Sweet Pea DSP was layered on a piece of So Saffron which is found in the stripes of the DSP.


Here is a close-up of the Pretty in Pink Sweet Pea Stitched Felt Flower and it was attached to the Whisper White Square using Mini Glue Dots. The scallop border around the square piece of Whisper White was made using the Scallop Trim Corner Punch from the Occasions Mini and the Scallop Trim Border Punch, which you can earn for FREE during Sale-A-Bration! In case you want to make this scallop frame square piece, your paper needs to measure 2-7/8".


All Supplies Stampin' Up! (unless otherwise indicated)
Stamps: Well Scripted
Ink: Old Olive
Paper: Old Olive, Whisper White, So Saffron, Sweet Pea Designer Series Paper Stack
Accessories: Sweet Pea Stitched Felt Flowers, Scallop Trim Corner Punch, Scallop Trim Border Punch, Mini Glue Dots


This next card was quick and easy, and I love the look of it! The card base is Chocolate Chip Cardstock, with a stip of Rose Red. The colors here, also play off of the strip of Sweet Pea Designer Series Paper.


Here is a close-up of the details on the card. As you can see, the bottom half of the card is a piece of Whisper White Cardstock that was embossed using the NEW Stampin' Up! Perfect Polka Dots Textured Impressions Folder, from the Occasions Mini. The medallion is an image from the Vintage Labels set, that is FREE during SAB. It was stamped in Rose Red ink onto Pretty In Pink Cardstock and then punched out using the Scallop Circle Punch and the 1-1/4" Circle Punch. The image behind the medallion is stamped in Chocolate Chip and punched out using the 1-3/8" Circle Punch. The "For You" sentiment is also from the Vintage Labels set and was stamped in Rose Red ink. Lastly, the ribbon is the NEW Pretty In Pink 5/8" Satin Ribbon from the Occasions Mini (have you noticed a theme yet?). ;o)


All Supplies Stampin' Up! (unless otherwise indicated)
Stamps: Vintage Labels
Ink: Rose Red, Chocolate Chip
Paper: Chocolate Chip, Rose Red, Whisper White, Sweet Pea Designer Series Paper
Accessories: Scallop Circle Punch, 1-1/4" Circle Punch, 1-3/8" Circle Punch, Stampin' Up! Perfect Polka Dots Textured Impressions Folder, Big Shot, Pretty In Pink 5/8" Satin Ribbon


And finally, the last card! Don't you just love the flower? I thought it was going to be complicated to make, but boy was I wrong. The cardbase here is Kraft Cardstock, and there is a piece of So Saffron adhered to the inside bottom of the card. The bottom of the cardbase is punched with the Scallop Border Punch and then pierced with the Paper Piercer. The stem is made out of a piece of Always Artichoke Cardstock and then tie a piece of Always Artichoke Grosgrain Ribbon for the "leaves". The "Friend to Friend" sentiment is from the Teeny Tiny Wishes set. .


This is a close-up of the flower. So, does it look hard to do? Well, trust me, it was easy peasy lemon squeezy! It is made using four flowers punched out of Elegant Eggplant Cardstock using the Five Petal Punch! You just layer three of the flowers, curling the petals up with your bone folder first and then the last flower you fold the petals in and adhere it closed using glue dots. You attach this to the center of the flower and then add a So Saffron button to the middle of it using Mini Glue Dots. Voila, you have a flower! :o)


All Supplies Stampin' Up! (unless otherwise indicated)
Stamps: Teeny Tiny Wishes
Ink: Elegant Eggplant
Paper: Kraft, So Saffron, Elegant Eggplant, Always Artichoke
Accessories: Five Petal Flower Punch, Scallop Border Punch, Fresh Favorites II Buttons, Always Artichoke 1/4" Grosgrain Ribbon, Paper Piercer, Piercing Mat, Mini Glue Dots


I just have some quick reminders: this month is the last month of Sale-A-Bration. So if you would like to earn your FREE Products, please hurry! Also, the 15% off for signing up as a Demonstrator ends at the end of March as well. If you'd like to place an order you can do so by clicking HERE 24/7, EMAILING ME, or by calling me. Contact me if you have any questions or would like to have a workshop. :o)


Happy Stampin'!

Wednesday, February 17, 2010

Sending Love Workshops

Edited to Add: Supplies list is now added for each project.

Hi Stampers!

Last month I had two "Sending Love" workshops in my home that was based around new items in the Occasions Mini Catalog. All projects were Valentine themed just in time to order supplies to create Valentine gifts! I had a good turn out and it was lots of fun. But, since I've never done two workshops in one weekend (one on Saturday and one on Sunday) I was pretty exhausted afterwards. Even still, it was fun catching up with some old customers and meeting new ones!


Here are the projects, enjoy!


Here is the first card we made. It uses the brand new I {Heart} Hearts stamp set. Remember that with every purchase of this set, $2 is donated to the Haiti Relief Fund. This set is available in wood mounted or in our NEW Clear Mounted Stamps! The beautiful background papers we used are also brand new and from the Occasions Mini Catalog. It is the Sending Love Specialty Designer Series Paper. I fell in love with this paper as soon as I saw it. The designs are beautiful and it has glitter! Lastly, we used the brand new Pinking Hearts Border Punch on the bottom part of the Real Red DSP.


Here's a close-up of the DSP and the hearts. I hope you can see the sparkly glitter on the paper, its beautiful! All four hearts were cut out and adhered with Stampin' Dimensionals. Also, you can see a close up of the Pinking Hearts Border Punch. Aren't the tiny little hearts cute?


Stampin' Supplies(All Stampin' Up! unless otherwise indicated):
Stamps: I {Heart} Hearts
Ink: Real Red, Pretty in Pink
Paper: Pretty in Pink, Very Vanilla, Sending Love Specialty Designer Series Paper
Accessories: Pinking Hearts Border Punch, Real Red 3/4" Polka Dot Grosgrain Ribbon, Stampin' Dimensionals, Paper Snips


This is the second card we made at my Sending Love Workshop. This card uses the brand new stamp set, Well-Scripted (available in wood mount or NEW clear mount) and the beautiful Sweet Pea Stitched Felt Flowers. Both of these items are from the Occasions Mini Catalog. The background paper is also another sheet from the Sending Love Specialty Designer Series Paper.


Here's a close-up of the card. The colors I used were taken from the Sweet Pea Stitched Felt Flowr itself. The main card base and the "Love You Much" sentiment are both Rose Red, the same as the flower. The Scallop Border Punch was used on a strip of Chocolate Chip Cardstock.


Stampin' Supplies(All Stampin' Up! unless otherwise indicated):
Stamps:
Well Scripted
Ink: Rose Red
Paper: Chocolate Chip, Rose Red, Very Vanilla, Sending Love Specialty Designer Series Paper
Accessories: Scallop Border Punch, Sweet Pea Stitched Flower, Tombow Multipurpose Glue, Stampin' Dimensionals

Sorry, I'm not sure why the background in this picture looks blue...but here's a picture of the final project we made. It was made using the Fancy Favor Box Bigz XL die, the Build-A-Bear Die and the BAB Valentine's Day Sizzlets. It was so quick and easy to make! And isn't the box and bear just cute!? I fell in love with the cute little bear...

Here's a top view of the box, it was filled with real red paper strips that were crimped and then filled with Valentine Heart Chocolates.


Stampin' Supplies(All Stampin' Up! unless otherwise indicated):
Stamps:
None
Ink: None
Paper: Real Red 12x12 Cardstock, Basic Black, Close To Cocoa, Creamy Caramel, Pretty in Pink, Retired Designer Series Paper Pack
Accessories: 1/2" Circle Punch, Build-A-Bear Stampin' Up! Bear Bigz Die, Stampin' Up! Beary Lovely Sizzlets Die,Stampin' Up! Beary Essentials Die, Stampin' Up! Beary Girl Die, Big Shot, Stampin' Dimensionals


Well, I hope you enjoyed looking at the projects. I will be posting a full supplies list for each project hopefully tomorrow. Remember, you can order from me 24/7 by clicking here. Have a great President's Day Holiday and Happy Stampin'!

Friday, June 19, 2009

Kind Thoughts

Hi Stampers,
Today I am sharing the 2nd card we made at my upline's house this month. It used the Kind Thoughts Small Decor Stencil. It was my first time working with this stencil and it is so super easy to use. Of course, just because these stencils were meant to be for home decor it does not mean we can't use them for cards or scrapbook pages! ;o)


For this card we used Kraft Cardstock as our base. The Kind Thoughts Brocade Stencil was done in Certainly Celery Ink onto Certainly Celery Cardstock. All I did was place the stencil over my cardstock and while holding it down, I used a Stampin' Sponge to sponge Certainly Celery over the stencil. Every now and then I would lift small sections of the stencil to make sure I was covering all the areas and the shading I wanted was right.

I then stamped the "Thanks" sentiment from the Set using Chocolate Chip Ink onto a strip of Kraft Cardstock. I then punched a hole using my Crop-A-Dile and attached an Antique Brass Jumbo Eyelet to the Kraft strip. Then I tied Chocolate Chip Taffeta Ribbon through the eyelet. Before attaching this to the card I tied some Chocolate Chip Grosgrain Ribbon around the Certainly Celery Layer and then attached this to the Kraft Cardstock. The sentiment is adhered using Stampin' Dimensionals.

All Supplies Stampin' Up!
Stamps: None
Ink: Certainly Celery, Chocolate Chip
Paper: Kraft, Certainly Celery
Accessories: Chocolate Chip 3/8" Taffeta Ribbon, Chocolate Chip 5/8" Grosgrain Ribbon, Kind Thoughts Brocade Small Decor Stencil, Antique Brass Jumbo Eyelets, Crop-A-Dile, Stampin' Dimensionals, Stampin' Sponge

Very fast and very beautiful! Hope you like it, I know I do! That's all for today. I hope you have a wonderful Friday. Tomorrow I'll be sharing the final project we made, till then Happy Stampin'!

Thursday, June 18, 2009

Urban Upsy Daisy

Hi Stampers!
It's such a beautiful sunny day today, I'm loving it! I was so getting tired of the June Gloom we were having and am very happy to see the days warming up. I love the hot, summer weather! :o)

Today I will be sharing one of the cards I made a few week's ago at my upline Yolanda's house. She is very creative, and has a Monthly Hostess Club that I try to attend often because she comes up with some great ideas! Plus, they are lots of fun and she has the Big Shot so I get to play with that too since I don't have it yet. ;o)


This is one of the cards we made at the June Hostess Club. Isn't it lovely? Before stamping the image, I used the Embossing Buddy and rubbed onto our paper to make sure that the embossing powder goes only where I want it. Then I stamped the flowers from Upsy Daisy in Versamark Ink onto the Urban Garden Designer Series Paper. I then poured White Embossing Powder and used a Heat Gun to emboss the image. This technique works best on dark colored cardstock or DSP. Don't the flowers just pop out?
The DSP was then layered onto Baja Breeze Cardstock and I stamped the sentiment, also from Upsy Daisy, onto a strip of Whisper White Cardstock using Kiwi Kiss Ink. The final step was to use the Kiwi Kiss Ribbon and tie it around a white paper clip and attach that to the card base. C'est tout, that's all! Quick, but a very elegant result.

All Supplies Stampin' Up! (unless otherwise indicated)
Stamps: Upsy Daisy
Ink: Kiwi Kiss, Versamark
Paper: Baja Breeze, Whisper White, Urban Garden Designer Series Paper
Accessories: White Embossing Powder, Kiwi Kiss Ink, Heat Gun (tool), Embossing Buddy, Kiwi Kiss 5/8" Striped Grosgrain Ribbon, white paperclip (Office Depot)

That's all for today. Check back tomorrow, when I'll be sharing the 2nd card we made at Yolie's house. Remember to check the Last Chance List daily for updates!

Have a great Thursday and Happy Stampin'!

Thursday, March 19, 2009

Delicate Dots SAB Scallop Bag


Good Evening Stampers! My goodness, it sure has felt like Spring here the past few days. The weather has been so beautiful and warm lately that the children at my Preschool have been enjoying a lot of water play. It's been lots of fun being able to go outside without layers of clothing to keep us warm!

Okay, enough chit chat on to the project. Here is the 3rd and final project we made at Yolie's Workshop. This was my very first time making one of the 3D items using the Bigz XL Dies and the Big Shot. This particular bag was made using the Bag With Scallops Bigz XL Die. It was die cut out using the Delicate Dots Designer Series Paper from the Sale-A-Bration Catalog. We then stamped the Scalloped image from the Polka Dot Punches Sale-A-Bration set in Whisper White Craft Ink onto Bashful Blue Cardstock. This was then punched out using the Scallop Circle Punch. We then used the Be Happy sentiment from the Darling Dots Stamp Set (FREE Level 1 Hostess Set), and stamped it onto Whisper White Cardstock using Certainly Celery ink. It was then punched out using the 1" Circle Punch and layered onto the Scallop Circle using Stampin' Dimensionals. The final step was tying the 1/4" Bashful Blue Grosgrain Ribbon. Another quick and easy project thanks to the Big Shot and the Bigz XL Dies! :o)

All Supplies Stampin' Up!
Stamps: Polka Dot Punches, Darling Dots
Ink: Whisper White Craft Ink, Certainly Celery
Paper: Delicate Dots Designer Series Paper, Whisper White, Bashful Blue
Accessories: 1/4" Bashful Blue Grosgrain Ribbon, Scallop Circle Punch, 1" Circle Punch, Bag With Scallops Bigz XL Die, Big Shot

Okay, that's it for tonight! Have fun, and remember only 2 weeks left for Sale-A-Bration. Happy Stampin'!

Tuesday, March 17, 2009

Urban Garden Thanks


Good Evening Stampers and Happy St. Patrick's Day! Here is the second card we made at Yolie's Hostess Workshop. Isn't it simple yet elegant? I really liked the color combination with this card and despite the ribbon, I think it would still work as a masculine card. What do you think? The main card is made out of Basic Gray Cardstock. We then used the Scallop Edge Punch on a strip of Baja Breeze Cardstock and layered a piece from the Urban Garden Designer Series Paper over it. Next, we used the 3/8" Basic Gray Taffeta Ribbon (Love it!) and tied it around the card base. We then stamped the "Thank You" sentiment from the Thank You Kindly Stamp Set in Basic Gray Ink onto Whisper White Cardstock. It was then punched out using the Key Hole Punch and layered onto a piece of Basic Gray Cardstock. Then we attached this to the cardbase using Stampin' Dimensionals. That's it! Doesn't get any easier than that. :o)

All Supplies Stampin' Up!
Stamps: Thank You Kindly
Ink: Basic Gray
Paper: Baja Breeze, Whisper White, Basic Gray, Urban Garden Designer Series Paper
Accessories: Scallop Edge Punch, Key Hole Punch, 3/8" Basic Gray Taffeta Ribbon, Stampin' Dimensionals


Have a great night and Happy Stampin'!

Monday, March 16, 2009

Fifth Avenue Floral

Hi Stampers! Well, I'm feeling a little bit better today, though I still have an ongoing headache. Here is a group picture of the projects we made at Yolanda's House (my upline) at the beginning of this month. Aren't they great?


The first card we made was using the NEW set, Fifth Avenue Floral. I really love this set and hope to order it real soon. There have been lots of samples floating around with some really great color combinations using this set, but this has to be my favorite one so far. For the flowers, we stamped them using Night of Navy, Baja Breeze and Kiwi Kiss. It was really easy, just stagger the flowers and stamp. Don't be afraid to layer them on top of each other. The result is beautiful, trust me.

The flowers were stamped on Whisper White Cardstock and layered onto Night of Navy Cardstock. We then punched the edge of a piece of Kiwi Kiss Cardstock using the NEW Eyelet Border Punch. Last, we tied the Baja Breeze 5/8" Striped Grosgrain Ribbon around the card and stamped the sentiment Birthday Wishes from Garden Greetings in Night of Navy Ink. That's it, couldn't be any easier but the result is lovely!

All Supplies Stampin' Up!
Stamps: Fifth Avenue Floral, Garden Greetings
Ink: Night of Navy, Kiwi Kiss, Baja Breeze
Paper: Whisper White, Kiwi Kiss, Night of Navy
Accessories: Eyelet Border Punch, Baja Breeze 5/8" Striped Grosgrain Ribbon


Have a great Monday and see you tomorrow with the next sample from Yolie's Workshop!

Sunday, February 8, 2009

Love You Much Workshop Samples

Hi Stampers!
I know this took me a week or two to post but let me tell you, homework has been building up and by the time I have any free time available to stamp or update my blog I'm mentally exhausted! I am hoping to work on some Thank You cards, Valentine's Cards and goodie bags today after I get home from my cousin's Bridal Shower if it's not too late.

These are the three projects we made at my Love You Much Workshop on January 25. They were very quick and easy to make. I had to make some substitutions with some of the projects because I had ordered extra cardstock but it didn't arrive in time so I had to make do with what I had. But I still think they turned out great, don't you?


Here is the front view of a box we made to hold some Valentine's Day treats. This box was a lot of fun to make and came together rather quickly! My original idea was to make it out of Riding Hood Red Cardstock but I didn't have enough to use, since my order did not arrive in time for the workshop, so I substituted by using Chocolate Chip instead. I still think it came out cute.
I don't remember where I got the measurements to make this box, but as soon as I find the information I will post it on my blog. If you happen to know what blog I saw the tutorial on please let me know so I can give credit where credit is due.

I love the little birds from this set and for the box, I used the Candylane Designer Series Paper to paper piece the two birds. Aren't they cute? I stamped them first in Close To Cocoa Ink onto Very Vanilla Cardstock. I then restamped them again with the Close to Cocoa onto two different pieces of scraps from the Candylane Designer Series Paper, cut out the bodies and glued them onto the Very Vanilla stamped images. Cute!!

This is a side view of the same box, so you could have a better idea of what it looks like. We filled it with some Skittles and mini Starbursts. Again, I needed to improvise here because I had wanted to use the small, flat cello bags to fill with treats but I did not get them in time. Oh well, such is life. The inside of the box is actually quite roomy so I'm thinking we probably could have fit some more candy inside of it. You can never have too much candy!


All Supplies Stampin' Up!
Stamps: Love You Much
Ink: Close To Cocoa
Paper: Chocolate Chip, Riding Hood Red, Pink Pirouette, Very Vanilla, Candylane Designer Series Paper
Accessories: Scallop Circle Punch, 1" Circle Punch, Heart Punch, Stampin Dimensionals, 1-1/4" Riding Hood Red Taffeta Ribbon, 1/8" Circle Punch


This is one of two cards we made at the workshop. Isn't it lovely? I had seen lots of samples using the Flower Fusion Too felt flowers but since I didn't have them I substituted yet again. LOL Instead, I used the Boho Blossoms punch and punched out the flowers out of Pink Pirouette and Close to Cocoa Cardstock and attached them to the flower image using the Silver Mini Brads and used my finger to curl up the petals.

The "Love You Much" was stamped using Close to Cocoa Ink and then I colored in the word using my Blender Pens and Riding Hood Red Ink. I then punched out the two hearts out of Riding Hood Red and Pink Pirouette Cardstock, using the new Heart to Heart Punch, and layered them over the "O." I also cut out the little heart from the scallop circle image after I stamped it onto Riding Hood Red Cardstock and popped it up using dimensionals and attached it to the scallop medallion.


All Supplies Stampin' Up!
Stamps: Love You Much
Ink: Close To Cocoa, Riding Hood Red, Pink Pirouette, Kiwi Kiss
Paper: Riding Hood Red, Very Vanilla, Close to Cocoa, Candylane Designer Series Paper
Accessories: Scallop Circle Punch, 1" Circle Punch, Boho Blossoms Punch, Heart to Heart Punch, Paper Piercing Tool, 1-1/4" Riding Hood Red Taffeta Ribbon, Silver Mini Brads, Blender Pens, Stampin' Dimensionals

The final card was a CASE from Andrea Walford. I love the way this card turned out! It's similar to the card above with a few minor changes. This is my sample that I had out for the workshop. As you can see in the picture, I did not use Pink Pirouette for my cardbase. However, I did supply my guests with Pink Pirouette Cardstock for their cards. I didn't have any enough, so my sample was made using I think it was, Pretty in Pink Cardstock.

The flower is again punched out using the Boho Blossoms punch and Pink Pirouette Cardstock and attached with the Silver Mini Brads. Tip: When attaching brads to your cards, attach them through at least a couple of layers, because if you attach it to just the top layer, the result will be lumpy, and we don't want that!

The "Love" was again colored in using Blender Pens and Riding Hood Red Ink. I stamped the hearts from the Love You Much set across the top to make a background in Riding Hood Red ink and then sponged the edges of the card. Voila!

All Supplies Stampin' Up!
Stamps: Love You Much
Ink: Riding Hood Red, Close To Cocoa, Kiwi Kiss
Paper: Pretty in Pink, Pink Pirouette, Riding Hood Red, Very Vanilla, Candyland Designer Series Paper
Accessories: 1-1/4" Riding Hood Red Taffeta Ribbon, Blender Pens, Paper Piercing Tool, Boho Blossoms Punch, Silver Mini Brads, Stampin' Sponges, Stampin' Dimensionals


Remember that Sale-A-Bration is going on right now! So take advantage and earn your free stamp sets for every $50 you spend! Contact me for more details or view the post here.


Have a wonderful day and Happy Stampin'!


Monday, December 8, 2008

Christmas Stamp-A-Stack Samples

Hi Stampers! Here are the pictures of the projects from Sunday's Christmas Stamp-A-Stack, as promised. Everyone had the opportunity to make 10 cards, 2 each of five designs, plus a small Winter House to put the cards in and give the whole set as a gift or use the box as a decoration.

This was my first intensive hands-on class so there were a few glitches here and there, but overall I think everyone had fun and enjoyed the projects we made. All projects were made possible because I won one of Andrea Walford's Class Planners for Demonstrators! She had some blog candy not too long ago and I was one of the lucky winners of her Punch Pals Class Planner! :o) I've got to tell you that her planners are very detailed and well thought out, I highly recommend them. I belive she also has some available for customers as well, not just demonstrators. If you are interested you can check out Andrea's blog here.

If there is enough interest with my customers, I hope to be able to offer more of these classes in addition to in-home workshops, in the future. So be on the look out for that. Okay, enough talk, now on to the projects! ;o)


Here's a group shot of four of the cards we made and the little Winter House. All of these particular projects were made using the Punch Pals Set and the cards measure 4x4, and we made matching envelopes as well! :o)


These two cards were made using the snowman image from the Punch Pals set and the Frosty Day Designer Series Paper in the Holiday Mini Catalog. Aren't the cute? You can't tell in the picutre but we added Dazzling Diamonds to the buttons on the Snowman and the berries on is hat.

All Supplies Stampin’ Up!
Stamps:
Punch Pals
Ink: Chocolate Chip, Close to Cocoa, Tangerine Tango, Kiwi Kiss, Bashful Blue, Real Red
Paper: Bashful Blue, Close to Cocoa, Whisper White, Kiwi Kiss, Frosty Day Designer Series Paper Accessories: Word Window Punch, Scallop Circle Punch, 1-3/8" Circle Punch, 1-1/4" Circle Punch, 1/8" Handheld Circle Punch, Piercing Tool, Piercing Mat, 2-Way Glue Pen, Dazzling Diamonds, Stampin' Sponges, Blender Pens, 3/8” Kiwi Kiss/Very Vanilla Satin Ribbon, Chocolate Chip Stampin' Write Marker, Whisper White Medim Envelopes


These next two cards use the Christmas Tree and Gifts images also from the Punch Pals Stamp Set. Again, there is Dazzling Diamonds on the star and the ornaments on the tree but you can't tell in the picture. Sorry about that!

All Supplies Stampin’ Up!
Stamps:
Punch Pals
Ink: Chocolate Chip, Close to Cocoa, Tangerine Tango, Kiwi Kiss, Bashful Blue, Real Red, Yoyo Yellow
Paper: Bashful Blue, Close to Cocoa, Whisper White, Kiwi Kiss, Frosty Day Designer Series Paper Accessories: Word Window Punch, Scallop Circle Punch, 1-3/8" Circle Punch, 1-1/4" Circle Punch, 1/8" Handheld Circle Punch, Piercing Tool, Piercing Mat, 2-Way Glue Pen, Dazzling Diamonds, Double Rectangle Punch, Stampin' Sponges, Blender Pens, 3/8” Kiwi Kiss/Very Vanilla Satin Ribbon, Chocolate Chip Stampin' Write Marker, Whisper White Medium Envelopes, Stampin' Dimensionals


Isn't this Little Winter House adorable! I love it so much! :o) The cards fit nicely inside the box, along with the coordinating envelopes. What a great project! I will try to take a better picture of this because the "Snow Hills" also have some Dazzling Diamonds on them and they look so sparkly and beautiful with it. The Snowman peeking through the window is actually one of the Snowman cards from the pictures above, peeking through. Hee,hee.

All Supplies Stampin’ Up!
Stamps:
Punch Pals
Ink: Chocolate Chip, Close to Cocoa, Tangerine Tango, Kiwi Kiss, Bashful Blue, Real Red
Paper: Bashful Blue, Close to Cocoa, Whisper White
Accessories: Scallop Edge Punch, 1-1/4" Square Punch, 2-Way Glue Pen, Dazzling Diamonds, Blender Pens, Chocolate Chip Stampin' Write Marker, Stampin' Sponges, Sticky Strip


This card came together rather quickly and was inspired by a card also made by Andrea Walford. The snowflake is from the Little Felt Flurries pack from the Holiday Mini Catalog, along with the Brown Felt Ribbon and the Ski Slope Designer Series Paper. I added Dazzling Diamonds to the snowflake by using the Tombow Multipurpose Adhesive. In the center of the Snowflake I place a red rhinestone brad from the Circle Fire Rhinestone Brads Set.

All Supplies Stampin’ Up!
Stamps:
Heard from the Heart
Ink: Chocolate Chip
Paper: Bashful Blue, Close to Cocoa, Whisper White, Ski Slope Designer Series Paper
Accessories: Crop-A-Dile, Circle Rhinestone Brads, Tombow Multipurpose Adhesive, Alpine Ribbon Originals, Dazzling Diamonds


Here is one of the doorprizes I gave away yesterday. Sorry but I don't have a picture of the other little notebook I made, but it's similar only that it used the Frosty Day Designer Series Paper instead of the Ski Slope, and the image was the little Penguin from the Punch Pals Set. I gotta tell you, I really love this set! :o) This notebook was a complete CASE of another notebook I made here.

All Supplies Stampin’ Up! (Unless otherwise noted)
Stamps: Punch Pals
Ink: Chocolate Chip, Close to Cocoa, Tangerine Tango, Kiwi Kiss, Real Red, Bashful Blue
Paper: Naturals White, Riding Hood Red, Ski Slope Designer Series Paper
Accessories: 3/8" Riding Hood Red Taffeta Ribbon, 2-Way Glue Pen, Dazzling Diamonds, Blender Pens, Sticky Strip, Mini Notebook (Michael's)

If you'd like to order this kit by mail from me, you are more than welcome to. The cost is $20 plus $4.25 for shipping and handling. Contact me if you're interested. You'll receive all the paper, punched pieces and measurements but not the images because it is against Stampin' Up! Policy. However, you can always order the set needed from me or you can substitute it with what you already own!

Well, Good Night and Happy Stampin'!