Showing posts with label 3-D Projects. Show all posts

Monday, May 24, 2010

April Workshop Part 2- Simply Said Candy Box

Hello Stampers!
Today, I'll be sharing this cute little candy box that we made last month at Yolie's house. This is the second project from my post HERE. It was easy to make and fast too! Gotta love that. ;o)
I'm sorry, but I don't remember the measurements of the box but I'll find out and add it to this post. So stay tuned for that.


Here's a side view of the box. Isn't it cute? The flowers and sentiment are from the Simply Said set.


Here's a front view. As you can see, the box is tied shut using the Bermuda Bay Ribbon. Inside is a handful of Hershey's Kisses, yummy!


And now, here's a view from the back of the box, standing up. Don't you just love it?! The flowers were stamped in Bermuda Bay, So Saffron and Pumpkin Pie. Love the color combo! ;o)


All Supplies Stampin' Up! (unless otherwise indicated)
Stamps:
Simply Said
Ink: Bermuda Bay, So Saffron, Pumpkin Pie
Paper: So Saffron, Whisper White
Accessories: Ticket Corner Punch, 1/16" Circle Punch, Linen Thread, Paper Trimmer with Scoring Blade, Bermuda Bay 1/2" Polka-Dot Grosgrain Ribbon


Just a quick reminder that you can now order from the Summer Mini Catalog! I'll be posting some cards I made at my workshop yesterday using new products form the mini. So make sure you come back to check those out! ;o)

Email me HERE.
CLICK HERE to order online 24/7.

Have a great night and Happy Stampin'!


Tuesday, April 6, 2010

Crystal's Diaper Cake

Good Evening Stampers!

I know I have been MIA for several weeks now but it has been rough for me health wise lately. I've been getting sick a lot lately and often feel tired when I get home from work. So I apologize for not keeping up with my daily posts. I am determined to get better with this, I promise!

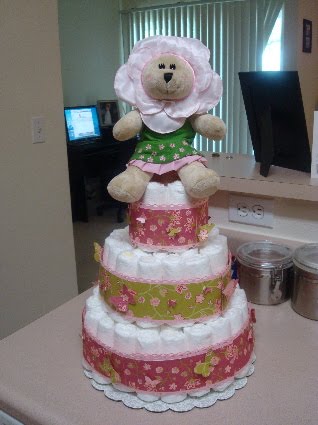
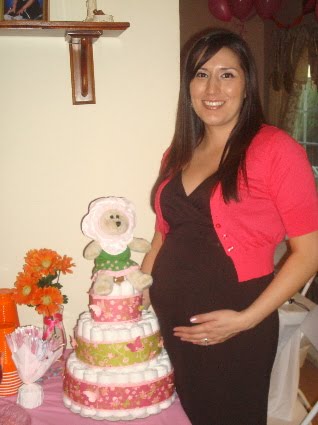
Today I am sharing a diaper cake I made for my cousins Will and Crystal's Baby Shower. They are expecting their first baby girl, Emily Kaylin. We are all very excited and can't wait for her to make her appearance in this world! :o) This was my very first time making a diaper cake and I think it came out great, and both Crystal and Will loved it, which is what mattered most!


Here's a picture of the beautiful Mom-To-Be Crystal with the Diaper Cake I made for her. Doesn't she look radiant, with that mommy glow? I can't believe that Baby Emily is due in 6 more days, how exciting! :o)


Here's a picture of the Diaper Cake. The theme for Emily's room is butterflies and the colors are pinks and greens. So in keeping with that theme I chose the retired Raspberry Tart Designer Series Paper and Pretty In Pink Cardstock.


This is a close-up of the topper. Isn't she cute? I found her at Starbuck's and thought her outfit would be perfect for the top of the cake, she coordinated perfectly!


A close-up of the bottom 2 layers.

And lastly, a close-up of the top layer and the butterflies. Aren't the butterflies just beautiful? I used the NEW Stampin' Up! Beautiful Wings Embosslits Die for the Big Shot. I love how it cuts out four different sized butterflies and embosses them as well! Isn't that great?! The Pretty in Pink CS is has a beautiful border that was punched out using the NEW Scallop Border Punch that was FREE last month during Sale-A-Bration.

Well, I hope you enjoyed looking at the Diaper Cake, that to be honest I am very proud of! All in all I used 72 diapers (newborn sized) to complete the three tiers for the cake. To be honest, that was the most tedious part: rolling up and tying rubberbands around each individual diaper! The rest of the cake came together easily, and beautifully I might add...;o)

That's all for today Stampers, I'll be sure to post pictures of Baby Emily when she arrives! Have a great night and Happy Stampin'!

Wednesday, February 3, 2010

Accordion Fold Purse

Good Morning Stampers!
I was looking through some pictures of projects that I have and realized that I never posted this beautiful purse I made a few months back! It was a class that Marcella, a fellow demonstrator and team member had for us and it was quick and fun to make!


I will post the recipe for this project later on today and hopefully will post pictures of the projects we made at my "Sending Love" Workshop this past weekend!
Have a wonderful day and Happy Stampin'!

Tuesday, June 23, 2009

End of the School Year Gifts

Happy Tuesday Stampers!
Last Friday was the last day of the regular school year for the children that are in the Pre-K program that I work at. It was a very fun but also very sad day because a lot of our children will not be returning for the summer program nor in September. :o( So I took lots of pictures of my kiddies and fought back the tears...

One of the other teachers and I decided to give the children (all 24 of them!) a little gift for the end of the year. So I went on Splitcoast Stampers and found this very easy tutorial to make a double-pocket bag. They came together rather quickly, in fact the other teacher (Brenda ;o) ) ended up making the rest of the bags on her own and I just filled them up with the goodies at home! Thanks Brenda! :o)


So here are the bags. I didn't take a picture of all of them because there was not enough space on the desk in our school office. So I placed a few of them by the window to get more natural light coming in and also used my small portable natural light as well, to take the pictures. I really love the way the bags came out!

As you can see, I ended up using lots of retired Designer Series Paper. So unfortunately, none of the papers used to make the bags is available to order. Sorry guys! I really have a tendency to hoard my DSP, and once it's retired it really does me no good to use at workshops so I have to start using it more for personal projects. Oh, all the ribbons used for the handles are also retired. The papers used are from the 2008-2009 Idea Book and Catalog and they are: Bali Breeze, Berry Bliss, Cutie Pie and East Coast Prep. The ribbons are also from the same catalog and they are: Purely Pomegranate, Blue Bayou and Wild Wasabi 3/8" Double-Stitched Ribbon.

Here's a side view of the bags so you can see the 2 pockets.


Here is what was included inside each bag. The children inside were very big into Perler Beads or Fuse Beads. If you've never heard of them you can find them here. They are so much fun and the children had a blast coming up with creations on their own or by following a pattern and then we would iron them and the beads would fuse together and they could keep their project for ever! Or at least until it got lost or accidentally broken. These beads were awesome for working on their fine motor skills, sharing, helping one another, math, etc. So I found these individual mini Perler Bead packs in the Dollar bins at Michaels' and had to snatch them up to give to the children! They also either received a post note with the intial of their first name or a wooden keychain that they could color themselves.

All Supplies Stampin' Up! (unless otherwise indicated)
Stamps: None
Ink: None
Paper: Bali Breeze, Berry Bliss, Cutie Pie and East Coast Prep Designer Series Paper (retired)
Accessories: Purely Pomegranate, Blue Bayou and Wild Wasabi 3/8" Double-Stitched Ribbon, 1/8" Circle Punch, Sticky Strip, (Perler Bead Packs, Wooden Key Chains, Alphabet Sticky Notes-from Michael's)

I hope you enjoyed looking at these bags as much as the children enjoyed receiving them!

Happy Stampin'!

Monday, June 22, 2009

Good Morning Sunshine Box

Hi Stampers!
Today I'm sharing the 3rd and final project that we made at my Upline Yolanda's house at the beginning of June. Wow, I can't believe we have only 8 more days left in June! Time sure is flying by fast! Pretty soon I'll be in Utah for the Stampin' Up! Convention! WooHoo!!

That reminds me, you only have 8 more days to order from the Occasions Mini Catalog as well as to order retired sets and accessories from the Last Chance List. Click on the image at the left of my blog to view the Mini Catalog. Click here to see the Last Chance Lists and the updated Accessories List.

Okay, now on to the project. We made an adorable box using the Good Morning Sunshine Designer Series Paper (I love this paper and the birds!) and the Box #2 Bigz XL Die for the Big Shot. This box actually came together very quickly and the result is adorable!


These birds are just so cute! The DSP matches the Cheep Talk set, which I want to buy so it is on my wishlist. I sure will miss this DSP when it's gone at the end of the month. :o( The tag was made by punching out a Scallop Circle out of Old Olive Cardstock. I then used my piercing tool to add holes in each scallop. I then punched out a 1-3/8" circle out of Chocolate Chip Cardstock and a 1-1/4" Circle out of a scrap of the Good Morning Sunshine Designer Series Paper. I then stamped the "For You" sentiment from the All Holidays Set in Chocolate Chip Ink. Oh, the first two circles are attached with SNAIL and then attached to the Old Olive Scallop Circle with Stampin' Dimensionals. I then tied a piece of So Saffron 7/8" Poly-Twill Ribbon around the box and attached the tag to it using Linen Thread.


Here's a side view of the box.


Here's a view of the box opened. You can see the little birds on the inside when the box is opened. Isn't it cute?


Here is a top view of the box showing the contents of the box. We were able to fit 3 Ferraro Rocher chocolates in the box. Yummy! You put a gift card instead of chocolates in the box or anything else you might want to fit into it. I hope you enjoyed this box as much as I did! :o)

All Supplies Stampin' Up!
Stamps: All Holidays
Ink: Chocolate Chip
Paper: Old Olive, Chocolate Chip, Good Morning Sunshine Designer Series Paper
Accessories: So Saffron 7/8" Poly-Twill Ribbon, Linen Thread, Box #2 Bigz XL Die, Big Shot, Scallop Circle Punch, 1-3/8" Circle Punch, 1-1/4" Circle Punch, Paper Piercing Tool, Stampin' Dimensionals

Remember, you can order from me any time by going to my Stampin' Up! website or by emailing or calling me. Have a great Monday and Happy Stampin'!


Sunday, June 21, 2009

Father's Day Card

Hi Stampers!
Sorry I didn't share yesterday like I had planned, but it was a pretty hectic day for me and I just didn't have time to get on the computer all day yesterday! My friends and I celebrated one of our friend's birthday yesterday and it was quite a "molecular" experience! We went to this restaurant called The Bazaar at the SLS Hotel. It was very interesting and the food and desserts were yummy!!! I highly recommend it, if you are adventurous with your food! :o)

Today, I am going to share the Father's Day Card I made for my Dad. It was so much fun to make and came together in about 10 minutes! You can't beat. I got the instructions and template for the collar from Amy Celona's blog: Ustamp4Fun. She has lots of great projects and almost always includes instructions to download!


This is what the card looks like slightly opened? Isn't it just a neat looking card? When my Dad saw it he loved it! The base of the card is made using Very Vanilla Cardstock. The DSP I used is Parisian Breeze Specialty (retiring), the sheet with the narrow stripes. This DSP is gorgeous and it is textured, I love it! It was adhered directly to the Very Vanilla card base. The collar was made out of Baja Breeze Cardstock (also retiring). The larger part of the color is adhered with SNAIL and the smaller pieces of the collar were adhered with Stampin' Dimensionals. The tie was easy peasy, lemon squeezy! I found a tutorial on Susan Boyd's blog, Card Of The Week.com. She has a video tutorial on how to fold an origami tie and also instructions available to download! Love that! In the video, she uses a 4x4 square piece of paper, but I didn't want the tie that big so I used a 2x2 square piece of DSP and it was just right. The tie was made using the solid sheet of Close To Cocoa DSP from the retired Berry Bliss. I attached the tie with Stampin' Dimensionals and SNAIL, then added the Silver Mini Deco Fasteners to the ends of the collar. That's it, easy right?

All Supplies Stampin' Up!
Stamps: None
Ink: None
Paper: Very Vanilla, Baja Breeze, Parisian Breeze Specialty Designer Series Paper, Berry Bliss Designer Series Paper
Accessories: Silver Mini Deco Fasteners, Stampin' Dimensionals, Paper Piercing Tool

Tomorrow I'll be sharing the 3rd project from my upline's workshop that I was supposed to share with you yesterday.

Happy Father's Day to my Dad and all Dad's!


Monday, June 15, 2009

My First Flower Pot Card, But Definitely Not My Last!

Hi Stampers!
I had a few birthdays coming this month so I decided to try my hand at those beautiful flower pot cards that have been floating around all over the internet right now. So what do you think?


This card was so easy to make, I was very surprised! Actually, I found a template on the wonderful Andrea Walford's Blog which helped a lot! She is a fellow demo from Canada and has lots of great tutorials and class planners available for other demonstrators. You can check out her blog by going here.


As you can see, the insert of the flower pot pulls out and that is the part of the card where you would stamp your greeting and write your own sentiments to the receiver. Isn't that nifty? And the best thing is that if you arrange the flowers just right, you will be able to fit this beautiful card in a regular sized A2 envelope! WooHoo. Imagine how much your family and friends would love getting this beautiful card in the mail?


Most of these cards have been made using the Daisies #2 and other flower dies for the Big Shot, or hand cut out the flowers from Fifth Avenue Floral. But since I don't have either, I improvised and used the Five Petal Flower Punch. The leaves were also made out of the Five Petal Flower Punch, punched out of Kiwi Kiss Cardstock and then I ran them through the Crimper to get that texture on them. I then just layered each flower over the "leaves" and attached them with Stampin' Dimensionals and also attached the completed flowers with Stampin' Dimensionals.

The red buttons are Riding Hood Red Buttons from the Button Bouquet (which are no longer available, sorry!) and the pink buttons are Pretty in Pink from the Soft Subtles button collection which is also retired (again sorry). I think they really look good on the flowers don't you? I also used the Scallop Edge punch on the Kraft colored rim of the pot and Bella Rose Designer Series Paper for the flower pot. The "Birthday Celebrations" is from the Upsy Daisy Stamp Set and was stamped on Whisper White Cardstock using Kiwi Kiss Ink. To hold the card together, I tied a piece of Kiwi Kiss/Very Vanilla 3/8" Satin Ribbon. That's it!

All Supplies Stampin' Up!
Stamps: Upsy Daisy
Ink: Kiwi Kiss
Paper: Whisper White, Kraft, Riding Hood Red, Pink Pirouette, Bella Rose Designer Series Paper
Accessories: Kiwi Kiss/Very Vanilla 3/8" Satin Ribbon, Scallop Edge Punch, Five Petal Flower Punch, Button Bouquet, Soft Subtles Button Collection, Crimper, Stampin' Dimensionals.

Have a great Tuesday and Happy Stampin'!

Sunday, June 14, 2009

I'm Back...and Graduation Favors

Hi Stampers!
I wanted to first off apologize for my long absence. This past school quarter was hectic to the say least, plus things were really busy outside of school as well. That being said, I was left with very little time to stamp. :o( But not so anymore! Yay, school is over for the summer which means I will have more free time to stamp. In fact, despite feeling a bit under the weather, I managed to do some stamping today. Actually, I have projects to share with you all for the entire week. Isn't that exciting! :o)

The first project I'm going to share are some graduation favors I made for my cousin Claudia. She graduated on Saturday from Cal State L.A. We are all very proud of her and wish her all the best in her future career!! So...I decided to make some favors to give to her guests at her Graduation Party. They came out darn cute if I do say so myself!


I got the inspiration to make these cute little Graduation Favors when I saw them over at Becky Robert's blog, Inking Idaho. As soon as I saw them I knew I wanted to make these for my cousin, and they were easy to make. I made a total of 70, but didn't take a picture of them all! Stop by her blog when you get the chance, she has some great projects and tutorials available!

Cal State L.A.'s school colors are black and gold so I used Basic Black Cardstock and punched out squares using the 1-3/8" Square Punch. I made the tassles out of DMC Embroidery Floss. I don't remember the name of the color but it was a dark yellow, not quite "Gold" but it matched Claudia's actual tassle perfectly. I found a video on You Tube that showed how to make a tassle, very quick and easy! I attached the tassle to the "cap" with silver mini deco fasteners and then adhered them to a Hershey's Nugget using Glue Dots. That's it, quick and easy. The guests and my cousin loved them!

All Supplies Stampin' Up! (unless otherwise noted):
Stamps:
None
Ink: None
Paper: Basic Black
Accessories: 1-3/8" Square Punch, Silver Mini Deco Fasteners, DMC Embroidery Floss (Michael's), Glue Dots, Piercing Tool, Hershey's Nuggets (Target)

Just a quick reminder to check out the Last Chance List of Accessories as it is updated daily to show you what is still available. Don't wait to get any of the accessories you might want because they may be gone and it will be too late! If you have any questions please feel free to email me or call me. Place your Last Chance orders online 24/7!

Have a great night and Happy Stampin'!

Thursday, March 19, 2009

Delicate Dots SAB Scallop Bag


Good Evening Stampers! My goodness, it sure has felt like Spring here the past few days. The weather has been so beautiful and warm lately that the children at my Preschool have been enjoying a lot of water play. It's been lots of fun being able to go outside without layers of clothing to keep us warm!

Okay, enough chit chat on to the project. Here is the 3rd and final project we made at Yolie's Workshop. This was my very first time making one of the 3D items using the Bigz XL Dies and the Big Shot. This particular bag was made using the Bag With Scallops Bigz XL Die. It was die cut out using the Delicate Dots Designer Series Paper from the Sale-A-Bration Catalog. We then stamped the Scalloped image from the Polka Dot Punches Sale-A-Bration set in Whisper White Craft Ink onto Bashful Blue Cardstock. This was then punched out using the Scallop Circle Punch. We then used the Be Happy sentiment from the Darling Dots Stamp Set (FREE Level 1 Hostess Set), and stamped it onto Whisper White Cardstock using Certainly Celery ink. It was then punched out using the 1" Circle Punch and layered onto the Scallop Circle using Stampin' Dimensionals. The final step was tying the 1/4" Bashful Blue Grosgrain Ribbon. Another quick and easy project thanks to the Big Shot and the Bigz XL Dies! :o)

All Supplies Stampin' Up!
Stamps: Polka Dot Punches, Darling Dots
Ink: Whisper White Craft Ink, Certainly Celery
Paper: Delicate Dots Designer Series Paper, Whisper White, Bashful Blue
Accessories: 1/4" Bashful Blue Grosgrain Ribbon, Scallop Circle Punch, 1" Circle Punch, Bag With Scallops Bigz XL Die, Big Shot

Okay, that's it for tonight! Have fun, and remember only 2 weeks left for Sale-A-Bration. Happy Stampin'!

Saturday, March 14, 2009

Fresh Cuts Tote

Hi Stampers! I started feeling a little under weather last night when I got home, and unfortunately I had to cancel my workshops for this weekend. I didn't want to, but my body has been really achy and I've had a headache all day today. So apologize for the inconvenience and I hope to reschedule soon! Okay, now on to the project.

The final project we made at Sandy's Fresh Cuts workshop was this cute little tote to hold the Fresh Cut Notes. You could give this away by itself or include it with all the Fresh Cut Notes, as a gift. It is made out of three pieces of the Tea Party Designer Series Paper. The instructions Sandy provided for us were very easy to follow and so this little tote was quick and easy to assemble. We punched out the top of the tote using the brand NEW Eyelet Border Punch. It's similar to the Scallop Edge Punch and adds a very nice and elegant look to your cards and projects.


The front of the tote is decorated with just the front piece of the Fresh Cut Notes card. We again used the Stampin' Up! Backgrounds 1 Texturz Plate for the front of the card and attached a piece of the Tea Party Designer Series Paper to the back of it, peeking through the flower. The flower is embellished with the flower image from the coordinating Fresh Cuts Stamp Set, which was stamped onto Almost Amethyst Cardstock and then cut out. It is attached using a Purple Rhinestone Brad. This is all layered to a piece of So Saffron Cardstock and then we tied a piece of the dyed 5/8" Whisper White Organza Ribbon around the card and tucked it under the front flaps of the tote. The handles for the tote also uses the 5/8" Whisper White Organza Ribbon which was dyed using Almost Amethyst ink. That's it! Your little tote is now ready to be given away!


All Supplies Stampin' Up!
Stamps: Fresh Cuts
Ink: Almost Amethyst
Paper: So Saffron, Tea Party Designer Series Paper
Accessories: Fresh Cut Notes, Circle Ice Rhinestone Brads, Eyelet Border Punch, Paper Piercing Tool, Stampin' Dimensionals, Whisper White Taffetta Ribbon, Stampin' Up! Backgrounds 1 Texturz Plates, Big Shot


Reminder: There are only 2 weeks left of Sale-A-Bration so don't delay! Take advantage of all the cool freebies by ordering from me online or contact me to place your order or if you have any questions.


Tune in tomorrow, I'll be sharing some projects my Upline Yolanda had for us to make at her last Hostess Club Workshop. Have a great Saturday!


Sunday, March 1, 2009

A Happy Heart

Hi Stampers! So it turns out that I forgot to show you this cute little goodie bag holder. I think that's what it's called. LOL I got the instructions on how to make this project, way back when I purchased the Crazy For Cupcakes class from Angie Juda. I love, love so many of her projects. This comes together rather easily and is cute!


The inside of the holder has the small, flat cello bag filled with candy. I took a side view of the holder so that you could see the inside. I'm sorry if it's too dark and/or you can't see the baggie. But trust me, it's there and it is filled with some yummy candy and tied with the Riding Hood Red Taffeta Ribbon.

To keep the entire holder closed, I just tied some of the Riding Hood Red/Very Vanilla Striped Grosgrain Ribbon (from the past Holiday Mini), around the whole package.

All Supplies Stampin' Up!
Stamps: A Happy Heart
Ink: Riding Hood Red
Paper: Riding Hood Red, Pink Pirouette, Very Vanilla, Candy Lane Designer Series Paper
Accessories: Riding Hood Red Taffeta Ribbon, 1-1/4" Riding Hood Red/Very Vanilla Striped Grosgrain Ribbon, Small Flat Cello Bags

REMINDER: March 31st is the last day of Sale-A-Bration, so don't forget to contact me to place your $50 order and earn your free stamps!

Have a wonderful Sunday and Happy Stampin'!

Sunday, February 8, 2009

Love You Much Workshop Samples

Hi Stampers!
I know this took me a week or two to post but let me tell you, homework has been building up and by the time I have any free time available to stamp or update my blog I'm mentally exhausted! I am hoping to work on some Thank You cards, Valentine's Cards and goodie bags today after I get home from my cousin's Bridal Shower if it's not too late.

These are the three projects we made at my Love You Much Workshop on January 25. They were very quick and easy to make. I had to make some substitutions with some of the projects because I had ordered extra cardstock but it didn't arrive in time so I had to make do with what I had. But I still think they turned out great, don't you?


Here is the front view of a box we made to hold some Valentine's Day treats. This box was a lot of fun to make and came together rather quickly! My original idea was to make it out of Riding Hood Red Cardstock but I didn't have enough to use, since my order did not arrive in time for the workshop, so I substituted by using Chocolate Chip instead. I still think it came out cute.
I don't remember where I got the measurements to make this box, but as soon as I find the information I will post it on my blog. If you happen to know what blog I saw the tutorial on please let me know so I can give credit where credit is due.

I love the little birds from this set and for the box, I used the Candylane Designer Series Paper to paper piece the two birds. Aren't they cute? I stamped them first in Close To Cocoa Ink onto Very Vanilla Cardstock. I then restamped them again with the Close to Cocoa onto two different pieces of scraps from the Candylane Designer Series Paper, cut out the bodies and glued them onto the Very Vanilla stamped images. Cute!!

This is a side view of the same box, so you could have a better idea of what it looks like. We filled it with some Skittles and mini Starbursts. Again, I needed to improvise here because I had wanted to use the small, flat cello bags to fill with treats but I did not get them in time. Oh well, such is life. The inside of the box is actually quite roomy so I'm thinking we probably could have fit some more candy inside of it. You can never have too much candy!


All Supplies Stampin' Up!
Stamps: Love You Much
Ink: Close To Cocoa
Paper: Chocolate Chip, Riding Hood Red, Pink Pirouette, Very Vanilla, Candylane Designer Series Paper
Accessories: Scallop Circle Punch, 1" Circle Punch, Heart Punch, Stampin Dimensionals, 1-1/4" Riding Hood Red Taffeta Ribbon, 1/8" Circle Punch


This is one of two cards we made at the workshop. Isn't it lovely? I had seen lots of samples using the Flower Fusion Too felt flowers but since I didn't have them I substituted yet again. LOL Instead, I used the Boho Blossoms punch and punched out the flowers out of Pink Pirouette and Close to Cocoa Cardstock and attached them to the flower image using the Silver Mini Brads and used my finger to curl up the petals.

The "Love You Much" was stamped using Close to Cocoa Ink and then I colored in the word using my Blender Pens and Riding Hood Red Ink. I then punched out the two hearts out of Riding Hood Red and Pink Pirouette Cardstock, using the new Heart to Heart Punch, and layered them over the "O." I also cut out the little heart from the scallop circle image after I stamped it onto Riding Hood Red Cardstock and popped it up using dimensionals and attached it to the scallop medallion.


All Supplies Stampin' Up!
Stamps: Love You Much
Ink: Close To Cocoa, Riding Hood Red, Pink Pirouette, Kiwi Kiss
Paper: Riding Hood Red, Very Vanilla, Close to Cocoa, Candylane Designer Series Paper
Accessories: Scallop Circle Punch, 1" Circle Punch, Boho Blossoms Punch, Heart to Heart Punch, Paper Piercing Tool, 1-1/4" Riding Hood Red Taffeta Ribbon, Silver Mini Brads, Blender Pens, Stampin' Dimensionals

The final card was a CASE from Andrea Walford. I love the way this card turned out! It's similar to the card above with a few minor changes. This is my sample that I had out for the workshop. As you can see in the picture, I did not use Pink Pirouette for my cardbase. However, I did supply my guests with Pink Pirouette Cardstock for their cards. I didn't have any enough, so my sample was made using I think it was, Pretty in Pink Cardstock.

The flower is again punched out using the Boho Blossoms punch and Pink Pirouette Cardstock and attached with the Silver Mini Brads. Tip: When attaching brads to your cards, attach them through at least a couple of layers, because if you attach it to just the top layer, the result will be lumpy, and we don't want that!

The "Love" was again colored in using Blender Pens and Riding Hood Red Ink. I stamped the hearts from the Love You Much set across the top to make a background in Riding Hood Red ink and then sponged the edges of the card. Voila!

All Supplies Stampin' Up!
Stamps: Love You Much
Ink: Riding Hood Red, Close To Cocoa, Kiwi Kiss
Paper: Pretty in Pink, Pink Pirouette, Riding Hood Red, Very Vanilla, Candyland Designer Series Paper
Accessories: 1-1/4" Riding Hood Red Taffeta Ribbon, Blender Pens, Paper Piercing Tool, Boho Blossoms Punch, Silver Mini Brads, Stampin' Sponges, Stampin' Dimensionals


Remember that Sale-A-Bration is going on right now! So take advantage and earn your free stamp sets for every $50 you spend! Contact me for more details or view the post here.


Have a wonderful day and Happy Stampin'!


Wednesday, January 14, 2009

Love You Much Samples

Hi Stampers! I thought I'd share the card and cute, little cello bag I made on Saturday with my Upline, Yolanda. She had a Hostess Appreciation Lunch for us on Saturday and we got to eat some yummy food and stamp! How awesome was that?


Both the card and bag are made using the supplies from the Love You Much Bundle. Remember, you can get this bundle at 20% off now through January 31st. Click here for more details.


All Supplies Stampin' Up!
Stamps:
Love You Much
Ink: Basic Brown
Paper: Kraft, Pink Pirouette, Rose Red, Whisper White, Riding Hood Red, Candy Lane Designer Series Paper
Accessories: VersaMarker, Clear Embossing Powder, Embossing Buddy, Heat Tool, Silver Brads, Flower Fusion Too, Heart to Heart Punch, Scallop Circle Punch, 1-3/8" Circle Punch, 1-1/4" Circle Punch, Paper Snips, Pink Pirouette 1-1/4" Grosgrain Ribbon, Whisper White 1/4" Grosgrain Ribbon, Paper Piercing Tool, M&Ms


Also, as a reminder January 18 is the last day to order any stamps or accessories from the Retired List. Remember select items are on sale during the Stampin' Up! Inventory Blow-Out! Plus, the last day to order from the Holiday Mini Catalog is also January 18. Contact me to place an order or shop now!

Have a great night and Happy Stampin'!

Sunday, January 11, 2009

A Frosty Christmas

Hi Stampers! Here are some cards I made for a friend, which entirely CASED and inspired by Dawn Griffith. She has a wonderful videw on how to make the icicles on the card below and on how to make the Frosty the Snowman card I made using only punches! To watch the videos go to Dawn's Stamping Thoughts. She has a great blog with lots of inspiring projects!


This card was a lot of fun to make but does require patience. The icicles on top of the card were made using Crystal Effects, Dazzling Diamonds and some wax paper. The patience comes in waiting for the Crystal Effects to dry before attaching it to your card. But I think the end result is definitely worth the wait, don't you?


All Supplies Stampin' Up!
Stamps:
Snow Swirled
Ink: Kiwi Kiss, White Craft Ink
Paper: Baja Breeze, Whisper White, Ski Slope Designer Series Paper
Accessories: Silver Mini-Deco Fasteners, Crystal Effects, Dazzling Diamonds, Ticket Corner Punch, Wax Paper


The Frosty Card I think is so CUTE! He came together rather quickly, with the help of various different punches and some Dazzling Diamonds. Dawn uses the Trio Flower Punch to add the flowers to his top hat but I don't have that punch so I used the smallest flower from the Boho Blossoms Punch. Don't you just love him!


All Supplies Stampin' Up!
Stamps: None
Ink: Pink Pirouette
Paper: Whisper White, Pumpkin Pie, Basic Black, Real Red
Accessories: White Signo Gel Pen, Boho blossoms Punch, 1-3/8" Circle Punch, 1-1/4" Circle Punch, 1" Circle Punch, 1/2" Circle Punch, Sponge Daubers, Dazzling Diamonds, 2-Way Glue Pen, Stampin' Dimensionals.

Thanks for stopping by and Happy Stampin'!

Monday, December 8, 2008

Christmas Stamp-A-Stack Samples

Hi Stampers! Here are the pictures of the projects from Sunday's Christmas Stamp-A-Stack, as promised. Everyone had the opportunity to make 10 cards, 2 each of five designs, plus a small Winter House to put the cards in and give the whole set as a gift or use the box as a decoration.

This was my first intensive hands-on class so there were a few glitches here and there, but overall I think everyone had fun and enjoyed the projects we made. All projects were made possible because I won one of Andrea Walford's Class Planners for Demonstrators! She had some blog candy not too long ago and I was one of the lucky winners of her Punch Pals Class Planner! :o) I've got to tell you that her planners are very detailed and well thought out, I highly recommend them. I belive she also has some available for customers as well, not just demonstrators. If you are interested you can check out Andrea's blog here.

If there is enough interest with my customers, I hope to be able to offer more of these classes in addition to in-home workshops, in the future. So be on the look out for that. Okay, enough talk, now on to the projects! ;o)


Here's a group shot of four of the cards we made and the little Winter House. All of these particular projects were made using the Punch Pals Set and the cards measure 4x4, and we made matching envelopes as well! :o)


These two cards were made using the snowman image from the Punch Pals set and the Frosty Day Designer Series Paper in the Holiday Mini Catalog. Aren't the cute? You can't tell in the picutre but we added Dazzling Diamonds to the buttons on the Snowman and the berries on is hat.

All Supplies Stampin’ Up!
Stamps:
Punch Pals
Ink: Chocolate Chip, Close to Cocoa, Tangerine Tango, Kiwi Kiss, Bashful Blue, Real Red
Paper: Bashful Blue, Close to Cocoa, Whisper White, Kiwi Kiss, Frosty Day Designer Series Paper Accessories: Word Window Punch, Scallop Circle Punch, 1-3/8" Circle Punch, 1-1/4" Circle Punch, 1/8" Handheld Circle Punch, Piercing Tool, Piercing Mat, 2-Way Glue Pen, Dazzling Diamonds, Stampin' Sponges, Blender Pens, 3/8” Kiwi Kiss/Very Vanilla Satin Ribbon, Chocolate Chip Stampin' Write Marker, Whisper White Medim Envelopes


These next two cards use the Christmas Tree and Gifts images also from the Punch Pals Stamp Set. Again, there is Dazzling Diamonds on the star and the ornaments on the tree but you can't tell in the picture. Sorry about that!

All Supplies Stampin’ Up!
Stamps:
Punch Pals
Ink: Chocolate Chip, Close to Cocoa, Tangerine Tango, Kiwi Kiss, Bashful Blue, Real Red, Yoyo Yellow
Paper: Bashful Blue, Close to Cocoa, Whisper White, Kiwi Kiss, Frosty Day Designer Series Paper Accessories: Word Window Punch, Scallop Circle Punch, 1-3/8" Circle Punch, 1-1/4" Circle Punch, 1/8" Handheld Circle Punch, Piercing Tool, Piercing Mat, 2-Way Glue Pen, Dazzling Diamonds, Double Rectangle Punch, Stampin' Sponges, Blender Pens, 3/8” Kiwi Kiss/Very Vanilla Satin Ribbon, Chocolate Chip Stampin' Write Marker, Whisper White Medium Envelopes, Stampin' Dimensionals


Isn't this Little Winter House adorable! I love it so much! :o) The cards fit nicely inside the box, along with the coordinating envelopes. What a great project! I will try to take a better picture of this because the "Snow Hills" also have some Dazzling Diamonds on them and they look so sparkly and beautiful with it. The Snowman peeking through the window is actually one of the Snowman cards from the pictures above, peeking through. Hee,hee.

All Supplies Stampin’ Up!
Stamps:
Punch Pals
Ink: Chocolate Chip, Close to Cocoa, Tangerine Tango, Kiwi Kiss, Bashful Blue, Real Red
Paper: Bashful Blue, Close to Cocoa, Whisper White
Accessories: Scallop Edge Punch, 1-1/4" Square Punch, 2-Way Glue Pen, Dazzling Diamonds, Blender Pens, Chocolate Chip Stampin' Write Marker, Stampin' Sponges, Sticky Strip


This card came together rather quickly and was inspired by a card also made by Andrea Walford. The snowflake is from the Little Felt Flurries pack from the Holiday Mini Catalog, along with the Brown Felt Ribbon and the Ski Slope Designer Series Paper. I added Dazzling Diamonds to the snowflake by using the Tombow Multipurpose Adhesive. In the center of the Snowflake I place a red rhinestone brad from the Circle Fire Rhinestone Brads Set.

All Supplies Stampin’ Up!
Stamps:
Heard from the Heart
Ink: Chocolate Chip
Paper: Bashful Blue, Close to Cocoa, Whisper White, Ski Slope Designer Series Paper
Accessories: Crop-A-Dile, Circle Rhinestone Brads, Tombow Multipurpose Adhesive, Alpine Ribbon Originals, Dazzling Diamonds


Here is one of the doorprizes I gave away yesterday. Sorry but I don't have a picture of the other little notebook I made, but it's similar only that it used the Frosty Day Designer Series Paper instead of the Ski Slope, and the image was the little Penguin from the Punch Pals Set. I gotta tell you, I really love this set! :o) This notebook was a complete CASE of another notebook I made here.

All Supplies Stampin’ Up! (Unless otherwise noted)
Stamps: Punch Pals
Ink: Chocolate Chip, Close to Cocoa, Tangerine Tango, Kiwi Kiss, Real Red, Bashful Blue
Paper: Naturals White, Riding Hood Red, Ski Slope Designer Series Paper
Accessories: 3/8" Riding Hood Red Taffeta Ribbon, 2-Way Glue Pen, Dazzling Diamonds, Blender Pens, Sticky Strip, Mini Notebook (Michael's)

If you'd like to order this kit by mail from me, you are more than welcome to. The cost is $20 plus $4.25 for shipping and handling. Contact me if you're interested. You'll receive all the paper, punched pieces and measurements but not the images because it is against Stampin' Up! Policy. However, you can always order the set needed from me or you can substitute it with what you already own!

Well, Good Night and Happy Stampin'!

Monday, November 24, 2008

Christmas Stamp-A-Stack Samples:Punch Pals


Punch up your gift giving this holiday season with this adorable little house and six coordinating cards with envelopes created using the Frosty Day DP and Punch Pals stamp set! Include one of these 4” x 4” gift cards with each of the presents you give out this year and then package up some treats in a cello bag, put them in the box, and give the box itself as a gift! You could also gift that hard-to-shop for person with the whole set!

Note: I have not decided yet which of these cards we will be making for the Christmas Stamp-A-Stack but we will be making perhaps 3 of these and 2 others using different sets for a total of 5 cards, not 6. Again, we will make 2 cards each of 5 designs for a total of 10 cards.

Date: Sunday, Dec. 7, 2008
Time: 1:30pm-4:30pm
Cost: $20
Location: Roz' House (Los Angeles, CA)
Please email me to sign up for this class: AngelFae20@aol.com

Supplies:

• Stamps: Punch Pals, Snow Swirled, Home for Christmas

• Inks: VersaMark pad, Chocolate Chip, Close to Cocoa, Kiwi Kiss, Tangerine Tango, Bashful Blue, Riding Hood Red, Real Red, Classic inks, Chocolate Chip Stampin’ Write Marker

• Paper: Frosty Day DP, Ski Slope DP, Whisper White, Close to Cocoa, Bashful Blue, Kiwi Kiss, Riding Hood Red, Real Red Medium Whisper White envelopes

• Accessories: Medium Whisper White Envelopes, Sticky strip, Snail adhesive, Stampin’ Dimensionals, 2-way glue pen, Little Felt Flurries, Alpine Ribbon, Riding Hood Red 1-1/4" Grosgrain Ribbon, Riding Hood Red Taffeta Ribbon, Kiwi Kiss/Very Vanilla satin ribbon, Silver Cord, Dazzling Diamonds glitter, Paper Snips, Scallop Edge Punch, 1/16” handheld circle punch, 1/8” handheld circle punch, ¾” circle punch, 1 ¼” circle punch, 1 3/8” circle punch, Scallop Circle punch, Tag Corner Punch, Corner Rounder Punch, Rectangle Punch, Small Tag Punch, Tag Punch, 1 ¼” Square Punch, Word Window Punch, Blender Pens, Stampin’ Scrub, Stampin’ Mist, Paper Trimmer & scoring blade, Bone Folder, Paper Piercing Tool, foam mat, Stampin’ Sponges, pencil & ruler

If you are unable to make it to the class but still want to make the cards then please contact me to purchase this Class-To-Go Kit. You will get all the Cardstock and Designer Series Paper you need to complete the projects, pre-cut but I cannot provide you the stamped images because it is against Stampin' Up! Policy to do so. You will also receive detailed instructions on how to complete the cards. If you don't have the above stamp sets you can order them from me here or you can substitute with whatever stamps you may have on hand. The cost for the Class-To-Go Kit is $20 plus $4.50 for shipping and handling.

Please do not hesitate to contact me if you have any questions, concerns, etc. I hope to see you all on Dec. 7!

Happy Stampin',

My 2nd Signature


Disclaimer: These classes are not available for purchase to other Stampin' Up! Demonstrators. If you are a demonstrator and are interested in this class, please email me @ AngelFae20@aol.com directly.